SwiftUI for Mac - Part 3
15th December 2019 • 1,573 words • 9 minutes reading time.
In part 1 of this series, I created a Mac app using SwiftUI. The app uses a Master-Detail design to list entries in an outline on the left and show details about the selected entry in the detail view on the right. In part 2 I explored using menus, adding all the expected user interface elements and opening secondary windows.
In this third and final part, I want to look at the various ways to present dialogs to the user.
There are four different types of dialog that I want to explore:
- Alert
- Action
- Sheet
- File dialogs (open & save)
So the first thing to do is add a footer to the DetailView to trigger each of these. I am going to separate this out into a new subview for neatness.
Alert
To make an Alert, I need an @State Bool which sets whether the alert is visible or not. All the button has to do is toggle that Bool. Stripping out the extra code and views, this is what I have.
struct DialogsView: View {
@State private var alertIsShowing = false
@State private var dialogResult = "Click the buttons above to test the dialogs."
var body: some View {
Button("Alert") { self.alertIsShowing.toggle() }
}
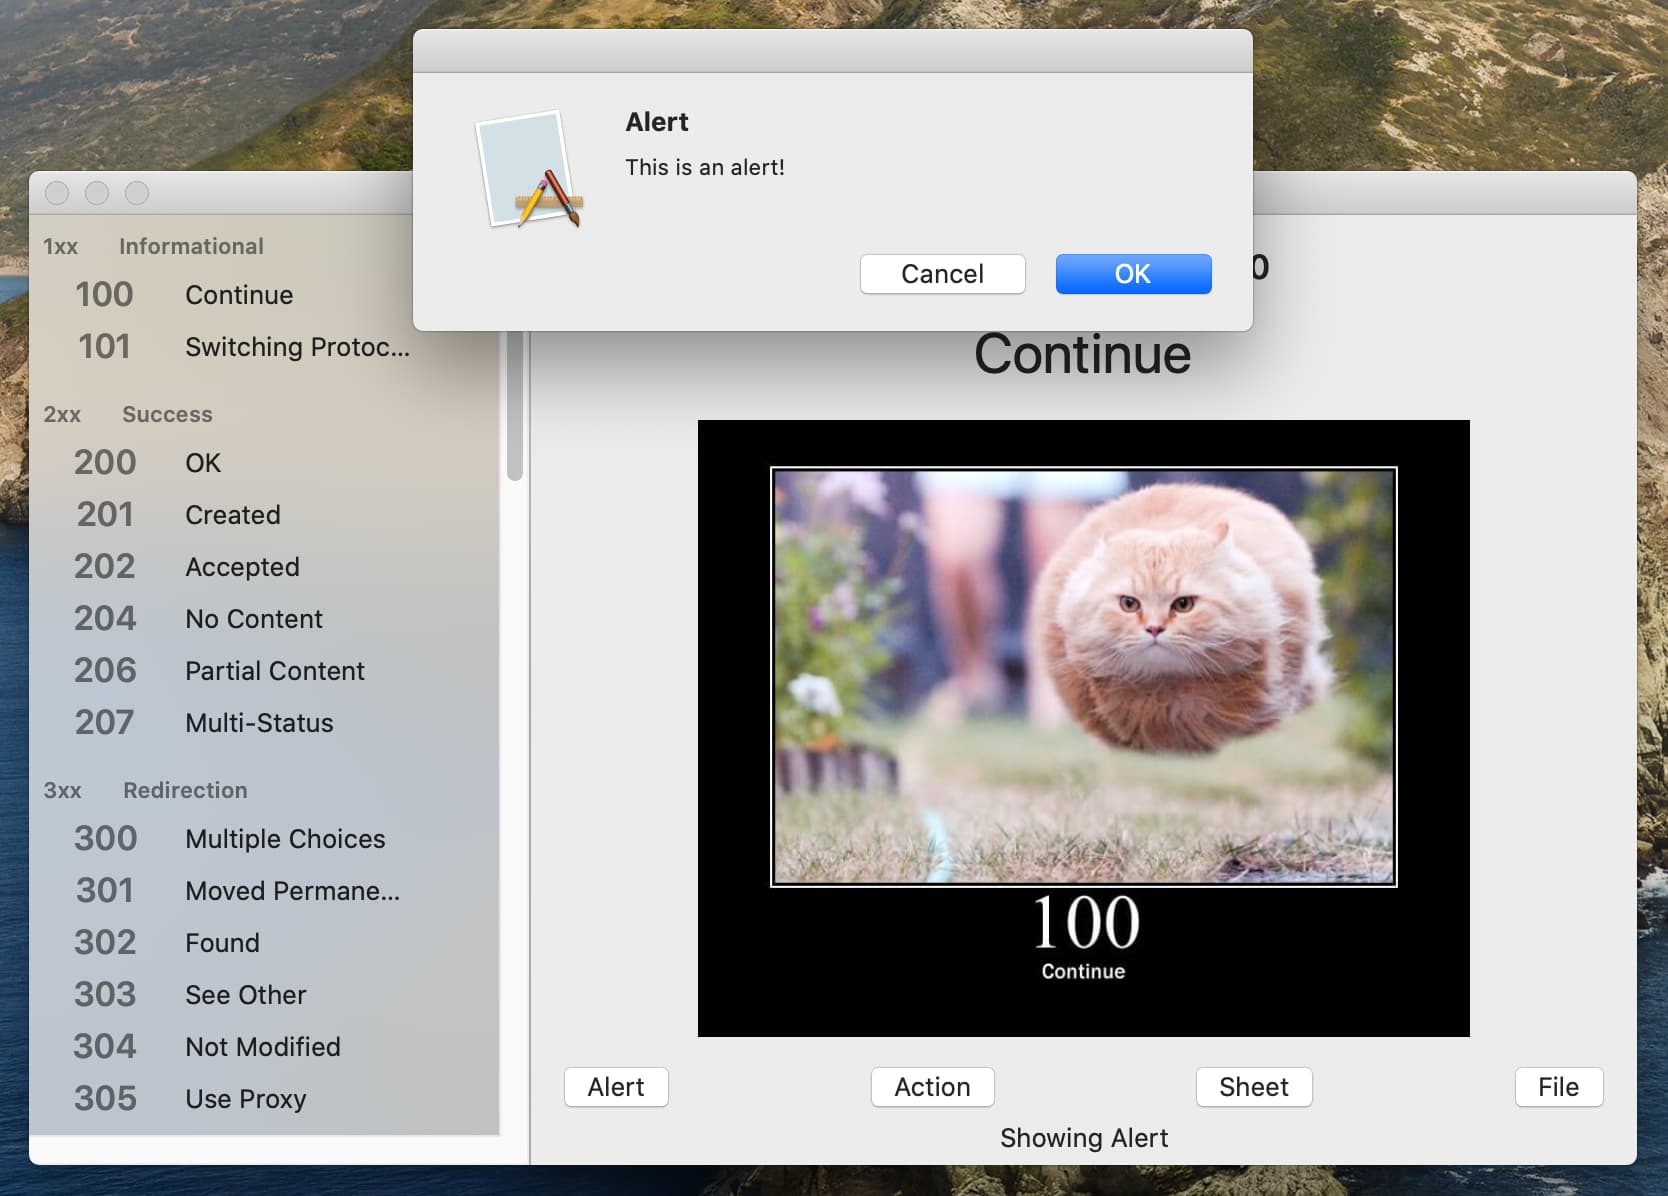
}To configure the alert itself, I added an alert modifier to the outmost view in this view. The dialogResult string is a diagnostic that I can use to confirm that the results of the various dialogs get passed back to the parent view.
  Alert(title: Text("Alert"),
        message: Text("This is an alert!"),
        dismissButton: .default(Text("OK")) {
          self.dialogResult = "OK clicked in Alert"
      })
There were a few things that tripped me up in this relatively short chunk of code. Firstly, both title and message must be Text views, not strings. If you get an error message that says "Cannot convert value of type 'String' to expected argument type 'Text'", then you have forgotten to use a Text view.
Then there is the button which auto-suggest tells me is of type Alert.Button. I couldn't find any documentation for this, but delving into the definition for Alert, I see that there are three pre-defined button types: default, cancel or destructive. Cancel actually has two variants and will use a label appropriate to the user's locale if no label is supplied.
Again, these buttons need a Text view as the label (if supplied) and can take an action closure, which I used to update my dialogResult string.
This version showed a single dismissButton but I saw that there was a variation of Alert with primary and secondary buttons. It was not obvious that these would also dismiss the alert dialog, but I tried anyway.
  Alert(title: Text("Alert"),
        message: Text("This is an alert!"),
        primaryButton: .default(Text("OK"), action: {
          self.dialogResult = "OK clicked in Alert"
        }), secondaryButton: .cancel({
          self.dialogResult = "Cancel clicked in Alert"
        }))
This worked very nicely and the Esc and Return keys triggered the two buttons as you would expect with both of them closing the dialog.
I tried using the destructive button type, but there was no difference to either the appearance or behavior of the button.
So Alert is a great choice for a text-based dialog, either for informational use or to allow two choices of action.
Action
Very short section here - 'ActionSheet' is unavailable in macOS! I probably should have researched that before I started this section. So use Alerts, I guess or a custom sheet.
Sheets
While Alerts have a very fixed structure, sheets allow us to put any SwiftUI view into a sheet dialog.
So I added another Bool for the Sheet button to toggle, and added this sheet modifier. SheetView right now is simply a TextView.
  .sheet(isPresented: $sheetIsShowing) {
      SheetView()
  }
This didn't work so well. It showed the sheet, but the sheet was tiny - only the size of the Text view it contained. And I had no way of dismissing it...
The size problem was solved by setting a frame on the Text view in SheetView.
The trick to dismissing the sheet is to pass it a Binding to the Bool that triggered it to open in the first place. If a button in the sheet sets this Bool back to false, the parent view will hide the sheet. That sounds confusing, but it works.
  .sheet(isPresented: $sheetIsShowing) {
      SheetView(isVisible: self.$sheetIsShowing)
  }
struct SheetView: View {
@Binding var isVisible: Bool
var body: some View {
VStack {
Text("This is a sheet.")
Button("OK") {
self.isVisible = false
}
}
.frame(width: 300, height: 150)
}
}Here is a very bad diagram that tries to explain what is happening:
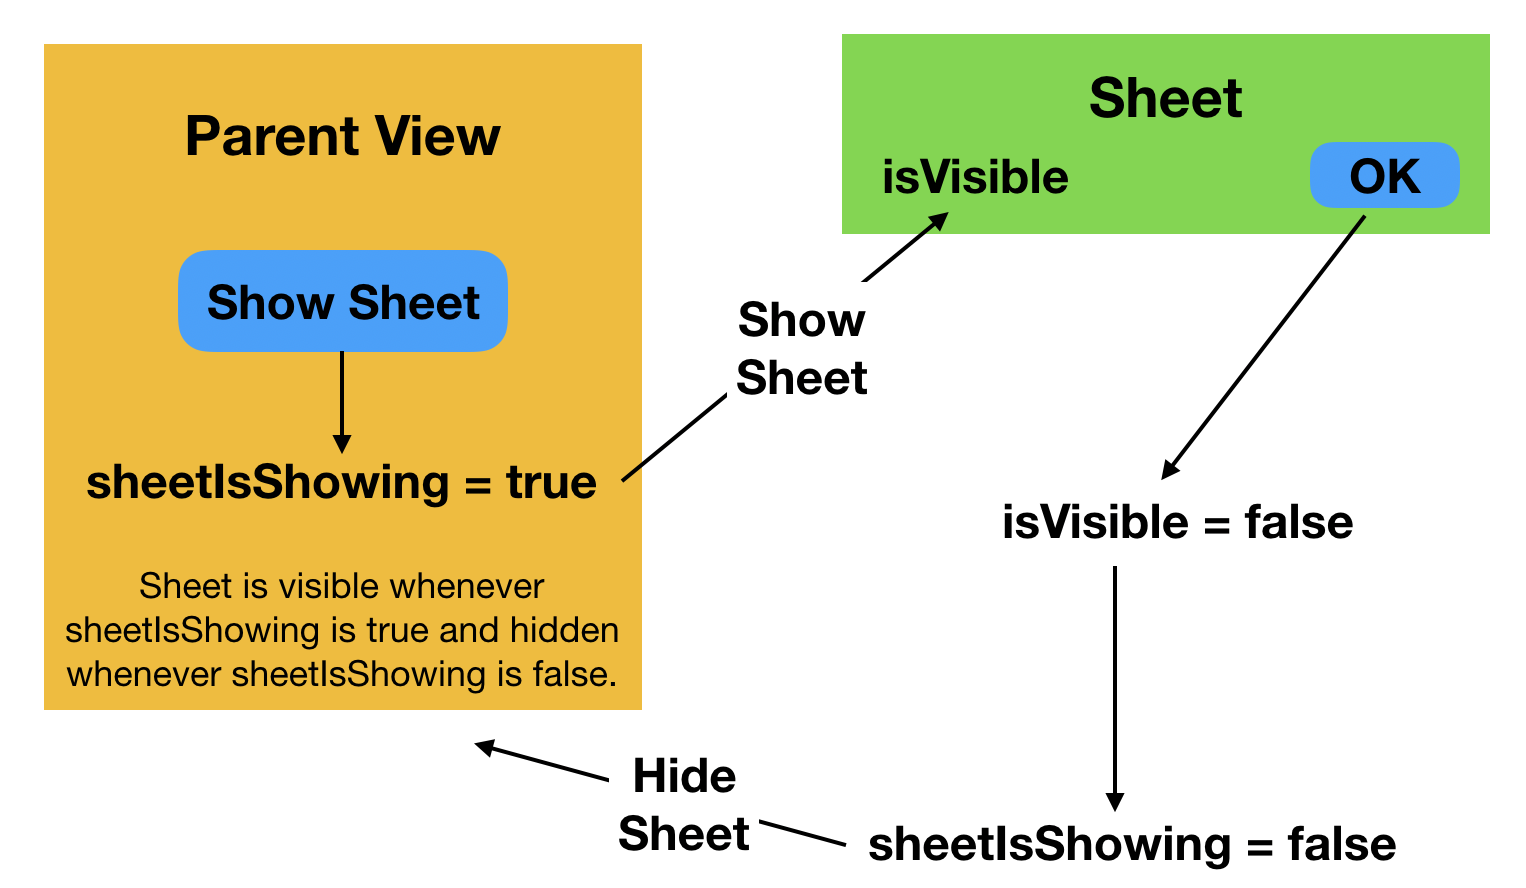
The parent view has an @State Boolean variable called sheetIsShowing. This is bound to the alert's isPresented so it dictates whenever the sheet is visible. When the Sheet button is clicked, this variable is set to true and the sheet opens. But at the same time, a Binding to this variable is passed to the sheet. I deliberately gave this a different name, so as to make it clear which View was changing what variable.
When the sheet wants to close, it does not close itself. Instead it sets this variable to false. Because it is a Binding, this sets the original sheetIsShowing variable on the parent view to false and the parent view then closes the sheet.
UPDATE: Look at Dismissing sheets in my post of extras & changes to this series for an alternative way to dismiss a sheet.
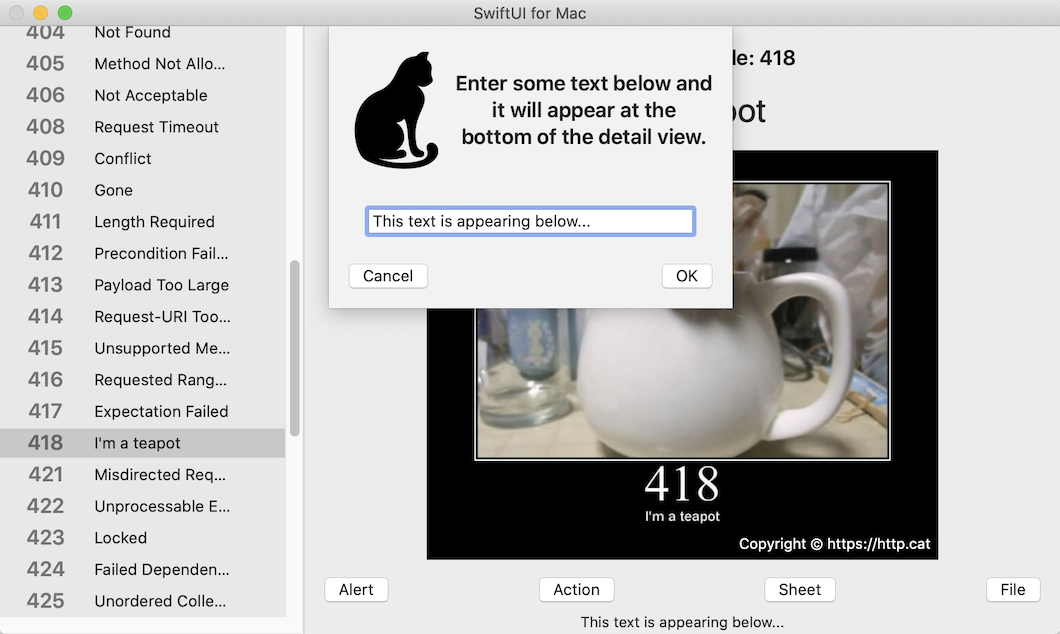
Sheets & Data
With this in place, I had the sheet opening and closing perfectly, but I was not yet passing data back & forth between the sheet and its parent view. I decide to put a TextField in the SheetView and bind its contents to the dialogResult property in the DetailView so that any edits appeared immediately in the DetailView. And while I am there, I might as well add some more decorations to the SheetView since it is a full View and not a restricted Alert.
Calling the SheetView changed to this:
  .sheet(isPresented: $sheetIsShowing) {
      SheetView(isVisible: self.$sheetIsShowing, enteredText: self.$dialogResult)
  }
And the SheetView itself (not all the interface is listed here for brevity):
struct SheetView: View {
    @Binding var isVisible: Bool
    @Binding var enteredText: String

    var body: some View {
        VStack {
            Text("Enter some text below…")
                .font(.headline)
                .multilineTextAlignment(.center)

            TextField("Enter the result of the dialog here…", text: $enteredText)
                 .padding()

            HStack {
                Button("Cancel") {
                    self.isVisible = false
                    self.enteredText = "Cancel clicked in Sheet"
                }
                Spacer()
                Button("OK") {
                    self.isVisible = false
                    self.enteredText = "OK: \(self.enteredText)"
                }
            }
        }
        .frame(width: 300, height: 200)
        .padding()
    }
}
I only had two issues with this now. I was not able to get the focus into the TextField automatically when the sheet opened and I was not able to assign keyboard shortcuts to the Cancel and OK buttons so that they could be operated without a mouse. And as I mentioned in the previous part, I was not able to make the OK button take on the default styling.
One useful technique that I developed: the SheetView is in the DialogsView.swift file instead of in its own SwiftUI file. It would probably be a good idea to separate it out but I didn't which meant that it had no Canvas preview to look at while I was laying it out.
So I edited the PreviewProvider like this, so that I could change the comments to switch it between showing the DialogsView and showing the SheetView.
struct DialogsView_Previews: PreviewProvider {
    static var previews: some View {
        // DialogsView()
        SheetView(isVisible: .constant(true), enteredText: .constant(""))
    }
}
Files
AppKit provides NSOpenPanel for selecting a file and NSSavePanel for saving. I will try to implement NSSavePanel to allow saving the current cat image.
Since this is an AppKit control rather than a SwiftUI control, I assumed that I would need to use NSViewRepresentable like I did for the NSColorWell in part 2. But while NSColorWell is a descendent of NSView, NSSavePanel is not. So I need a new idea.
Rather naively, I thought maybe I could just create an NSSavePanel in a function inside DialogsView and see what happened.
  func saveImage() {
      let panel = NSSavePanel()
      panel.nameFieldLabel = "Save cat image as:"
      panel.nameFieldStringValue = "cat.jpg"
      panel.canCreateDirectories = true
      panel.begin { response in
          if response == NSApplication.ModalResponse.OK, let fileUrl = panel.url {
              print(fileUrl)
          }
      }
  }
Crash & burn... so what if I made the NSSavePanel an @State property of the View? No, that crashed even faster. Maybe SwiftUI Views don't like this sort of thing, but how about if I get the Application Delegate to handle it? What if I moved the saveImage method to the App Delegate and changed the calling function to access it there?
Still crashed. At this stage I am beginning to wonder if I know how to use an NSSavePanel. Time to create a simple test app without SwiftUI and see what happens. Well it appears that I no longer know how to use an NSSavePanel. Code from an older project that works fine, will not work in my new sample project!
Guess what - it was another macOS Catalina security issue which I would have realised faster I had opened the Console. Back to the Signing & Capabilities section of the target settings and this time I set File Access for User Selected File to Read/Write.
Now the NSSavePanel opens when called from DialogsView and prints the selected file URL if one is chosen.
But this is all happening in DialogsView, which is a subview of DetailView. And DetailView is the view that holds the image, not DialogsView. So how can I save the image? Do I pass the URL to DetailView or pass the image to DialogsView? Or do something clever with Notifications and Subscriptions?
I really don't know what is best, but I have decided to post a Notification with the URL as its object. DetailView can receive this Notification and save the image whenever it is received.
So I replaced the print line in the saveImage() method with:
NotificationCenter.default.post(name: .saveImage, object: fileUrl)And in DetailView, I set up the publisher:
    private let saveImageUrlSelected = NotificationCenter.default
         .publisher(for: .saveImage)

    var body: some View {
        VStack {
          // view code removed for brevity
        }
        .onReceive(saveImageUrlSelected) { publisher in
            if let saveUrl = publisher.object as? URL,
                let imageData = self.catImage?.tiffRepresentation {
                if let imageRep = NSBitmapImageRep(data: imageData) {
                    if let saveData = imageRep.representation(using: .jpeg,
                                                              properties: [:]) {
                        try? saveData.write(to: saveUrl)
                    }
                }
            }
        }
    }
And there we have it. Three types of dialogs demonstrated in a SwiftUI for Mac app:
- Alerts: good for simply text-only dialogs
- Sheets: good for more complex dialogs
- Panels: AppKit dialogs that can be called from a SwiftUI View.
I think this time I really am finished. This article has already expanded out into a 3-part monster, so I think it is way past time that I stopped typing. I hope you have enjoyed this series. Please use any of the buttons below to contact me or use the Contact page on this site. I would love to hear from anyone who found this series useful or who had any suggestions or corrections to make.
The final project is available on GitHub if you would like to download it and take a look.