SwiftUI for Mac - Part 2
15th December 2019 • 2,300 words • 12 minutes reading time.
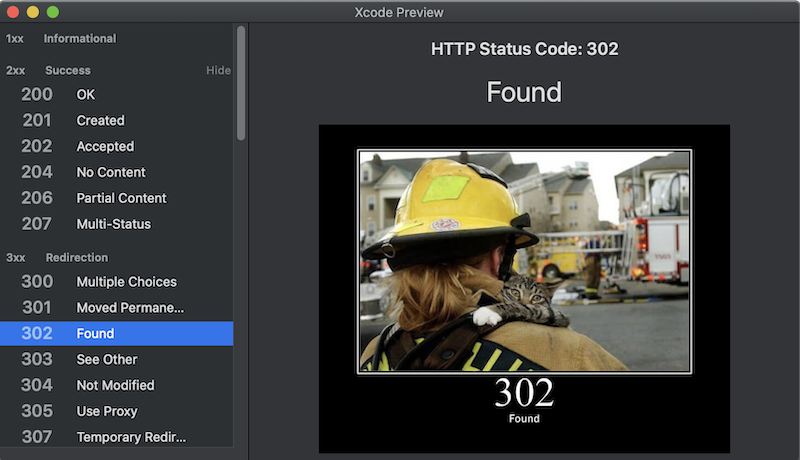
In part 1 of this series, I created a Mac app using SwiftUI. The app uses a Master-Detail design to list entries in an outline on the left and show details about the selected entry in the detail view on the right.
Now it is time to explore some more of the features of a Mac app with SwiftUI.
Menus
I had already discovered that the menu bar is configured in the Main.storyboard file. As an experiment, I will add new menu items that allows the user to select between dark mode, light mode or the system mode.
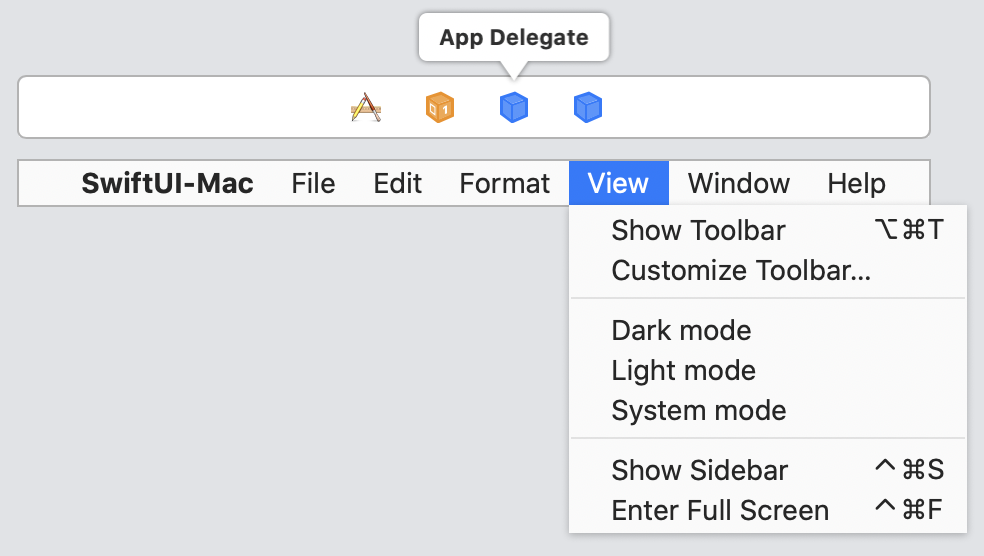
Looking at the possibilities along the top that I could send the menu command to, the App Delegate looks like the best option, especially since these menus will change the entire app.
I opened AppDelegate.swift in the Assistant Editor and Control-dragged from each of the new menu items to create the 3 IBActions and added the code to set the mode.
    @IBAction func darkModeSelected(_ sender: Any) {
        NSApp.appearance = NSAppearance(named: .darkAqua)
    }

    @IBAction func lightModeSelected(_ sender: Any) {
        NSApp.appearance = NSAppearance(named: .aqua)
    }

    @IBAction func systemModeSelected(_ sender: Any) {
        NSApp.appearance = nil
    }
And since I realized that I would want to check or un-check these based on the current settings, I added IBOutlets for each of these menu items too. As a side note, I love how Xcode is now clever enough to decide whether to add an IBOutlet or an IBAction depending on where in the file you Control-drag to.
Using a Property Wrapper
Changing mode worked perfectly in the Xcode Preview and in the built app, but the app was not storing this or displaying the current selection with a check mark in the menu.
For storing the selection, I decided to try another new thing and use a UserDefaults property wrapper, based on this post by Antoine van der Lee.
I configured a UserDefault wrapped variable for the mode, set it whenever the menu items changed it and added a function to read it in and apply it on startup.
    @UserDefault("system_mode", defaultValue: "system")
    var systemMode: String
It would be neater to use an enum here instead of strings, but that would have required fiddling with rawValues to save the data, so for this first test, I stuck to strings.
The code to toggle the checkmarks in the menu items is standard stuff and nothing particularly SwiftUI related, so I won't detail it here, but it is in the GitHub project if you are interested.
Passing menu data to a View
This worked fine and the app worked equally as well in dark or light modes, but I wanted to test how to communicate data back from the menus to the SwiftUI views.
As a totally pointless but possibly amusing feature, I decided to add a menu item to flip the cat image and then work out how I could send that to the ContentView.
I added the new menu item to the Format menu and as a first attempt, I tried to Control-drag from there into the ContentView. It didn't take, so I guess I need to send the message to the AppDelegate as before and then pass it on to the ContentView. I feel like this might be a good place to use a Publisher although so far I have only used the built-in ObservableObject type publishers.
In this case, it would make more sense to have the DetailView respond to the menu, since it contains the image. But trying to add an @IBAction to a SwiftUI View struct gives this error: Only instance methods can be declared @IBAction so I am using the App Delegate instead. I feel like this is a problem I need to solve, or the AppDelegate is going to end up filled with @IBActions, but for now, let's keep going.
In AppDelegate.swift, I added the IBAction for the Flip Image menu item and had it issue a Notification, after setting up an extension on Notification.Name to de-stringify the name of the notification.
    @IBAction func flipImage(_ sender: Any) {
        NotificationCenter.default.post(name: .flipImage, object: nil)
    }
In DetailView.swift, I set up a Boolean @State property to store whether the image was flipped or not and added an onReceive handler to toggle it. Since this is updating the UI, I made sure that it happened on the main thread, but I am not sure whether this is necessary, or whether onReceive uses the main thread automatically.
UPDATE: Check out Subscribing on the Main Thread in my post of extras & changes to this series for an alternative way to make sure the updates happen on the correct thread.
    @State private var imageIsFlipped = false

    // ...

  .onReceive(flipImageMenuItemSelected) { _ in
    DispatchQueue.main.async {
        self.imageIsFlipped.toggle()
    }
  }
Once I had that Boolean property, I added two more modifiers to the image. Don't hate me for the force un-wrapping. I tried using if-let but it wouldn't compile so I check for catImage != nil before using this force-unwrap.
  Image(nsImage: catImage!)
      .resizable()
      .aspectRatio(contentMode: .fit)
      .rotation3DEffect(Angle(degrees: imageIsFlipped ? 180 : 0),
                        axis: (x: 0, y: 1, z: 0))
      .animation(.default)
Now the image can be flipped from the menu item or even by using the keyboard shortcut. And with a smooth animation (smoother in the app than in this gif).

Opening another window
For my next challenge, I want to open a second window that I can use to show samples of various UI elements. As I want to open it from a menu command, my first thought was to add a Window Controller to the Main storyboard and open it that way. I replaced the default View Controller with a Hosting Controller so that I could insert my SwiftUI View into it.
I had great trouble finding any documentation or examples of how to implement this, but after a lot of trial and error, here is what I got to work:
- Drag a Hosting View Controller into the storyboard and connect it to the menu item with a segue.
- Set the Presentation property for the window controller to Single so that multiple copies of the window are not created.
- Create a new Swift file and subclass NSHostingController. Don't bother using a Cocoa class file - the template doesn't work. Use the code below, replacing SamplesView with the name of the SwiftUI view you want to display.
import SwiftUI

class SamplesHostingController: NSHostingController<PrefsView> {
      @objc required dynamic init?(coder: NSCoder) {
          super.init(coder: coder, rootView: SamplesView())
      }
}- Back in the storyboard, set the class of the HostingController to this sub-class: SamplesHostingController in my case.
- Set a minimum size for the new Window Controller, otherwise it shrinks to a very small stripe on the screen.
- Add the
.frame(maxWidth: .infinity, maxHeight: .infinity)modifier to the root view in the view you are displaying - my SamplesView.
With all these in place, I was able to open and close a Samples window that was displaying my SwiftUI content.
User Interface Elements
Not all the expected user interface elements are available in SwiftUI and some of the ones that are implemented are using different names. Again this is a point at which iOS development has got all the attention, so there are conversion tables out there listing UIKit elements and their SwiftUI equivalents, but I was not able to find a similar listing for AppKit. If you find one, please let me know.
Anyway, I experimented and got most of what I wanted as you can see below. The sample app on GitHub shows the SwiftUI code for these samples, but the main advice I would give is firstly to use the Object Browser to look for what is available and then to check out the styles that can be applied to the element you have chosen.
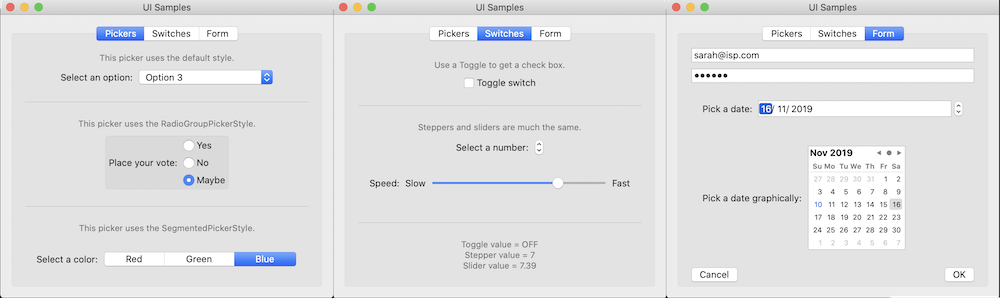
Mostly, I managed to achieve what I wanted but there were a few exceptions.
Buttons were a bit odd as there are multiple button styles listed, but I found that they either all looked the same or they disappeared completely. I was not able to style a button with an image and text which is now easy to do in iOS. And I was not able to set a button as the default button and I could not work out how to set a keyboard equivalent for a button. (Setting the keyboard equivalent to Return or Enter might set it to the default style automatically.)
Of the other UI elements that I wanted to use, a color picker was the main one missing. So I decided to embed an NSColorWell from AppKit into my SwiftUI view.
The process for embedding a UIKit view is quite well documented elsewhere and the AppKit equivalent was not significantly different. Replace every "UI" with "NS" and you are nearly there.
First I made a struct that conformed to NSViewRepresentable and had the required two functions: makeNSView(context:) and updateNSView(_:context:). I supplied an @Binding variable to hold the selected color as an NSColor since that is what the NSColorWell uses.
struct EmbeddedColorWell: NSViewRepresentable {
    @Binding var selectedColor: NSColor

    func makeNSView(context: Context) -> NSColorWell {
        NSColorWell(frame: .zero)
    }

    func updateNSView(_ nsView: NSColorWell, context: Context) {
        nsView.color = selectedColor
    }
}
Back in my SwiftUI view, I was then able to use EmbeddedColorWell just like any other SwiftUI view, passing it a binding to an @State variable to set and get the selected color.
EmbeddedColorWell(selectedColor: $selectedColor)UPDATE: Be sure to read Passing data back from AppKit in my post of extras & changes to this series. This is an important fix that is needed to make this embedded control pass data back properly.
The other stumbling block that I encountered was that I had no way to close the window programmatically, in response to a button click or some other interaction. Maybe this was not the best way to open a fully SwifUI window, but it was still an interesting experiment.
One thing I learned while working on this project was that SwiftUI can be a bit too clever about working out what needs to be redrawn in the previews. If you edit something in an separate file to the View, you may need to force a re-build to get the updates to show.
Communicating Between Windows
The last feature that I need to explore is transferring data between two windows. I tested using a .sheet modifier to open a dialog and that worked exactly as it would in an iOS app - I was able to pass an @Binding variable to the sheet window and any changes made to that in the sheet window flowed back to the calling view.
But I want to set up a Preferences window which will be opened from the menu bar and not directly from the ContentView or any of its sub-views.
I started out by using the same technique as before with a Hosting View Controller. And here is where I came mightily unstuck as I could not make a data connection. I had hoped an EnvironmentObject would work, but I could not get an EnvironmentObject through to the HostingController as it was not in the same view hierarchy.
So instead of trying to use the storyboard, I decide to see if I could use something similar to the initial window creation and call that new window from my ContentView so that it was part of the view and therefore the data hierarchy.
As usual, there was a lot of trial and error involved here, but I came up with a workable solution.
struct PrefsView: View {
    var body: some View {
        Text("Hello, Prefs!")
            .frame(maxWidth: .infinity, maxHeight: .infinity)
    }

    var window: NSWindow!
    init() {
        window = NSWindow.createStandardWindow(withTitle: "Preferences",
                                               width: 300,
                                               height: 100)
        window.contentView = NSHostingView(rootView: self)
        window.makeKeyAndOrderFront(nil)
    }
}
For convenience and reusability, I made an extension on NSWindow that created a window with the basic properties configured, much like they are in AppDelegate. I temporarily added a Button to ContentView like this:
  Button("Prefs") {
      let _ = PrefsView()
  }
This opened the window perfectly, but it had a problem: repeatedly clicking the button kept opening a new window instead of bringing the existing one to the front.
After a lot more trial and error, this is what I ended up with for my PrefsView struct:
struct PrefsView: View {
    @State var prefsWindowDelegate = PrefsWindowDelegate()

    var body: some View {
        Text("Hello, Prefs!")
          .frame(maxWidth: .infinity, maxHeight: .infinity)
    }

    var window: NSWindow!
    init() {
        window = NSWindow.createStandardWindow(withTitle: "Preferences",
                                               width: 300,
                                               height: 100)
        window.contentView = NSHostingView(rootView: self)
        window.delegate = prefsWindowDelegate
        prefsWindowDelegate.windowIsOpen = true
        window.makeKeyAndOrderFront(nil)
    }

    class PrefsWindowDelegate: NSObject, NSWindowDelegate {
        var windowIsOpen = false

        func windowWillClose(_ notification: Notification) {
            windowIsOpen = false
        }
    }
}
So my PrefsView opens its own window and sets a window delegate that records when the window is closed.
I removed my temporary button and back in AppDelegate.swift, I added an IBAction called by the Preferences menu item:
    var prefsView: PrefsView?

    @IBAction func openPrefsWindow(_ sender: Any) {
        if let prefsView = prefsView, prefsView.prefsWindowDelegate.windowIsOpen {
            prefsView.window.makeKeyAndOrderFront(self)
        } else {
            prefsView = PrefsView()
        }
    }
And this gave me what I was after - a view that opened from a menu item but that knew itself whether it still had a window so could decide whether to open a new one or bring the existing one to the front. This looks a bit convoluted, but it doesn't appear to cause any memory leaks and the responsibility for the window rests on the view that uses it, which feels right to me.
After I had this working, getting the data passing around was quite simple. I created a Prefs class to store the preference data. I wanted this data stored in UserDefaults, but since I also wanted to use an ObservableObject with the @Published property wrapper, I was not able to use the @UserDefaults property wrapper that I had used for the app mode.
So instead I used @Published with a didSet that saved the changed data to UserDefaults. Thanks to @azamsharp for this technique.
class Prefs: ObservableObject {
    @Published
    var showCopyright: Bool = UserDefaults.standard.bool(forKey: "showCopyright") {
        didSet {
            UserDefaults.standard.set(self.showCopyright, forKey: "showCopyright")
        }
    }
}
This preference will dictate whether a copyright notice is shown on every cat image, so it needs to be available to DetailView and to PrefsView. Since I did not want to pass it through every view on the way to DetailView, I decided to use an EnvironmentObject. But I was not able to work out how to set the environmentObject for the PrefsView as I created it, so I ended up sending an @ObservedObject to PrefsView but using an @EnvironmentObject for DetailView. (Actually for CatImageView as I had extracted the image from DetailView as a subview.)
In AppDelegate.swift:
    let prefs = Prefs()

    // and in the openPrefsWindow IBAction:
    prefsView = PrefsView(prefs: prefs)
In PrefsView.swift:
@ObservedObject var prefs: PrefsIn CatImageView (a subview of DetailView):
struct CatImageView: View {
    @EnvironmentObject var prefs: Prefs

    let catImage: NSImage
    let imageIsFlipped: Bool

    var body: some View {
        Image(nsImage: catImage)
          // modifiers as before

         .overlay(
             Text(prefs.showCopyright ? "Copyright © https://http.cat" : "")
                 .padding(6)
                 .font(.caption)
                 .foregroundColor(.white)
                 .shadow(radius: 5)
             ,alignment: .bottomTrailing)
    }
}
And that is that! I have shown how it is possible to create an entire Mac app using SwiftUI.
I am sure that there are numerous ways that this could be improved, so if you have any ideas or suggestions, please use one of the buttons below to contact me.
If you want to check out the project at this stage, here is a link to the relevant GitHub commit. Or if you would prefer, here is a link to the final version of the project.
Moving on to an unplanned part 3 of this series, I am going to experiment with various forms of dialog.