SwiftUI Data Flow
24th January 2021 • 2,825 words • 16 minutes reading time.
SwiftUI gives us a completely new way to lay out out user interfaces, in a declarative and responsive way. Your data dictates what is displayed. But this leads to a new problem - how should the data models be constructed and how can they be passed around between the various views that make up your app?
In this post, I intend to discuss the possibilities with examples.
Update - January 2021: I think the information in this post is still all valid except for one change. When you are initializing an ObservableObject, you should use @StateObject instead of @ObservedObject. Your views can receive objects that are owned by other views as @ObservedObject or @EnvironmentObject but the owner of the data should always create the data object with @StateObject.
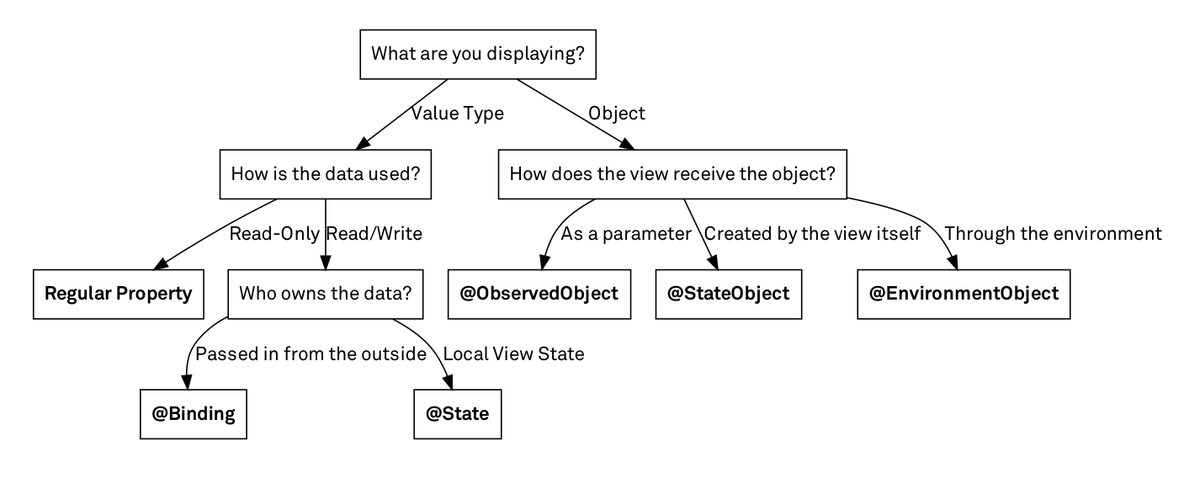
For a great diagram showing what data object type to use where, check out this image from Chris Edihof - thanks Chris!
If you read this article before November 18th 2019, please check out ObservableObject & @ObservedObject - Part 2 again as it has gone through several iterations, which are all shown for comparison.
At WWDC 2019, some Apple engineers gave a great presentation on Data Flow Through SwiftUI and I strongly recommend watching the video. But you need to watch it twice. First watch it so that you can get started, and then, when you feel that this is all way too complicated, watch it again and it will start to click into place. The only real difference between then and now is that BindableObject has become ObservableObject.
I guess I could stop there, but I will be illustrating my ideas with code examples, which I hope will make things clearer. Some of the examples are rather contrived in order to make a point, but the sample code is also sprinkled with other SwiftUI examples which I hope will prove useful.
Download the sample project from GitHub and open it in Xcode. Go to ContentView.swift and make sure the Canvas is open. Click Resume to make the view appear. Then click the Live Preview button and wait for the view to become active. I recommend clicking the Pin button at the bottom left of the Canvas so that you can investigate the code samples, while still working in the main navigation.
Data Flow Options
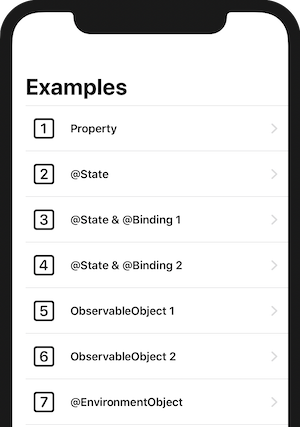
There are 5 ways to specify data in SwiftUI:
- Property
- @State
- @Binding
- ObservableObject & @ObservedObject
- @EnvironmentObject
Property
struct Property: View {
    // Property
    let greeting = "Hello from SwiftUI!"

    var body: some View {
        // Using property directly
         Text(greeting)
             .font(.title)
    }
}
In this example, the greeting property is used in the view. greeting is static, so the view does not need to monitor it for changes. This may seem like a simplistic and obvious example, but separating it out allows for localization or re-usability.
The property could also have been supplied by a parent view and this is a really useful feature of properties. A parent view can have some dynamic data that it can use to set properties in a subview where the subview only needs to display the data statically. This data will change as the parent view changes but the subview will not be able to change the data in the parent view.
And it is important to remember that not everything needs to be set up with one of these new property wrappers.
@State
This is where things start to get very interesting in the SwiftUI world. SwiftUI views are contained in structs, so are non-mutable. Also, the views are re-created every time the data changes, so any properties are re-created then too. By marking a property with the @State property wrapper, you are telling SwiftUI that you want it to keep this data in a separate portion of memory, allow it to be mutated, and preserve the current value during the view refresh.
struct UsingState: View {
    @State private var toggleValue = true

    var body: some View {
        // Using state with 2-way binding
         Toggle(isOn: $toggleValue) {
             Text("Toggle is \(self.toggleValue ? "ON" : "OFF")")
         }
         .padding(50)
    }
}
In this example, toggleValue is declared as a Bool with a property wrapper of @State. Inside the Toggle, the isOn value is bound to toggleValue by the leading $. This allows the variable to set the toggle and the toggle to set the variable - 2-way binding.

@State variables are always value types and are usually local to their view, so Apple recommends marking them as private.
And unlike properties, @State variables allow you to have data that is dynamic but it can still be passed to subviews as properties for display.
@Binding
One problem with building SwiftUI views is that it is very easy to end up with a gigantic Pyramid of Doom as you embed views within views within views. The solution is to extract subviews, but then you need a way to pass the data to the subview.
This is where @Binding comes in as it allows you to tell a view that the data for a property is actually coming from a parent but that the subview is allowed to change that property and that change will flow back to the parent's data.
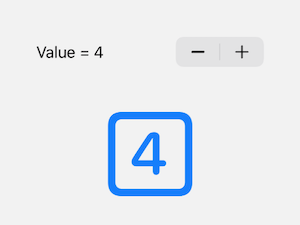
struct Numbers: View {
    @State private var stepperValue = 0

    var body: some View {
        NumberChooser(stepperValue: $stepperValue)
    }
}

struct NumberChooser: View {
    // Using state from parent with 2-way binding
    @Binding var stepperValue: Int

    var body: some View {
        ZStack {
            VStack {
                Stepper(value: $stepperValue, in: 0...20) {
                    Text("Value = \(stepperValue)")
                }

                NumberBlock(stepperValue: stepperValue)
            }
        }
    }
}

struct NumberBlock: View {
    // As this view never changes the value, there is no need to bind it
    var stepperValue: Int

    var body: some View {
        Image(systemName: "\(stepperValue).square")
    }
}
In this example, I have declared a stepperValue property and marked it with @State.
The interface has been extracted into a subview called NumberChooser and a Binding to the stepperValue property has been passed to NumberChooser using the $ prefix, which will ensure that changes to the value can come back. Inside NumberChooser this property is wrapped in the @Binding property wrapper to indicate that it is coming from another source and that changes will be returned.
NumberChooser itself has a subview called NumberBlock but it is a display view only and never mutates the value itself, so stepperValue is passed to this subview as a property only, without the $ prefix. It will still be updated every time the data changes as it is contained by the view with the @State property.
@State & @Binding - Part 2
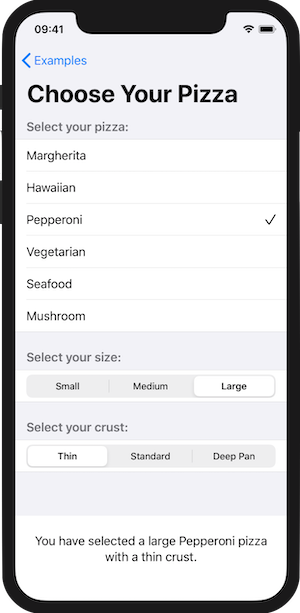
So far, the examples have used primitive data types for the @State properties, but given that @State properties are value types, any struct can be used. In the next example, I use a struct to hold the properties of a pizza order and use a SwiftUI Form to allow selections.
struct PizzaView: View {
    // Using @State for a struct
    @State private var pizza = Pizza()

    var body: some View {
            VStack {
                Form {
                    // Using 2-way binding but each component
                    // only needs 1 property from the struct
                    PizzaNamePicker(selectedPizzaName: $pizza.name)
                    PizzaSizePicker(selectedPizzaSize: $pizza.size)
                    PizzaCrustPicker(selectedPizzaCrust: $pizza.crust)
                }

                // Text representation to prove that the
                // subviews are modifying the parent struct
                Text(pizza.pizzaSelection)
             }
            .navigationBarTitle("Choose Your Pizza")
    }
}
Each subview gets the property it needs using @Binding:
struct PizzaNamePicker: View {
    @Binding var selectedPizzaName: PizzaName

    var body: some View {
      // see the GitHub project for more details
    }
The form consists of 3 subviews - one each for selecting the pizza, size and crust. The Pizza struct holds all three properties, but each subview only needs a Binding to the single property that it controls. The Text view after the Form is to prove that all the selections come back to the parent.
ObservableObject & @ObservedObject - Part 1
These are used if your data model is a class and you want to use reference-based data instead of the struct's value-based system.
To set up a data model to be Observable, it must conform to the ObservableObject protocol and any property that needs to be observed should have the @Published property wrapper. This makes sure that any time this property changes, all the Views that are observing the instance of this data model will be notified to perform the UI updates.
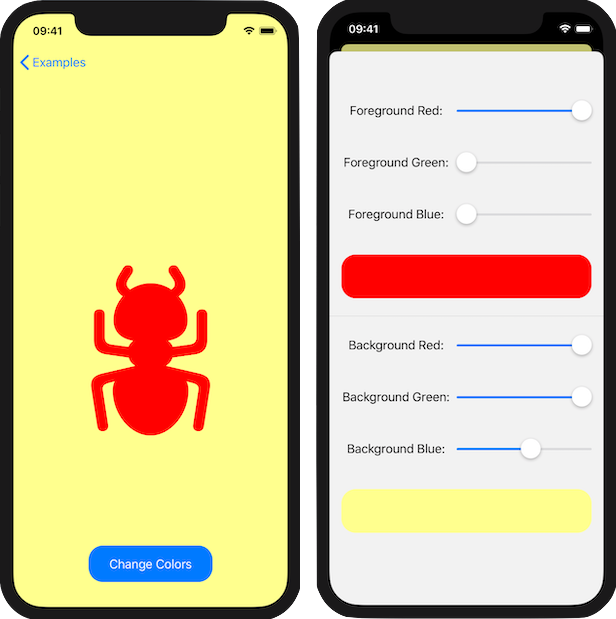
For this example, I have a ColorSet class with six color components that are used to assemble two RGB colors.
class ColorSet: ObservableObject {
    // ObservableObject
    // The 6 color components are marked as @Published so any changes
    // get published to the views that are observing

    @Published var foregroundRed = 0.0
    @Published var foregroundGreen = 0.0
    @Published var foregroundBlue = 0.0

    @Published var backgroundRed = 1.0
    @Published var backgroundGreen = 1.0
    @Published var backgroundBlue = 1.0
}
In the primary view, I set up an instance of this class as an @ObservedObject.
struct ColorSetView: View {
    @ObservedObject private var colorSet = ColorSet()
}
The background of the view and the foreground of a system image are set using these colors. A button presents a sheet with sliders to allow editing these colors. The colorSet is passed to the sheet like this:
  .sheet(isPresented: $showChooser) {
      // notice that this does not use $ as the ColorChooser
      // will get a reference to the ColorSet object
      ColorChooser(colorSet: self.colorSet)
  }
struct ColorChooser: View {
@ObservedObject var colorSet: ColorSet
var body: some View {
// ...
}
}A sheet is not the ideal way of presenting a view that uses sliders for editing, but I wanted to demonstrate that changing the sliders instantly changes the value of the @ObservedObject for the parent view as well as for the subview. Editing the background color components shows the new background color in the back at the top of the sheet.
The ColorChooser itself uses 2 subviews and they get a reference to the ColorSet in the same manner.
ObservableObject & @ObservedObject - Part 2
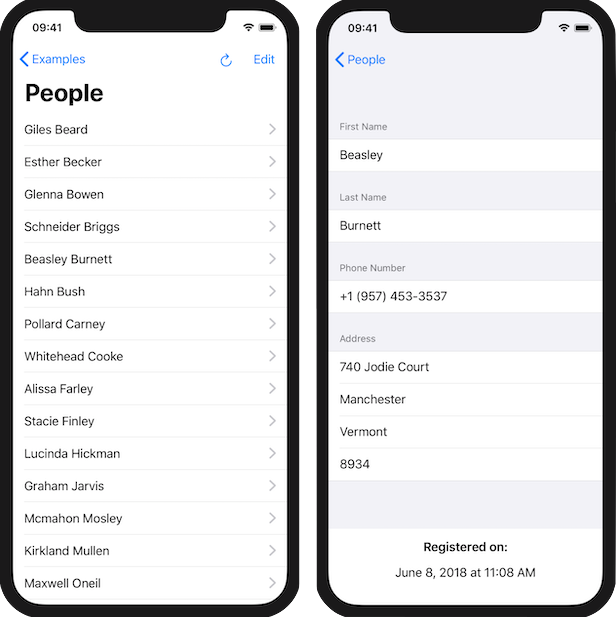
This section was that one that caused me the most trouble when writing the example app. I wanted to display a list of data and have each entry link to an editable detail view with the edits flowing back to the parent list.
The initial display of data in a List was straight-forward and I was then able to have the list rows navigate to a detailed view for each entry. The problem was getting the edited data back to the parent List.
The basic data model was an ObservableObject that publishes an array of PersonViewModel objects.
class PersonListModel: ObservableObject {
    @Published var persons: [PersonViewModel] = []

    func fetchData() {
        // get data from web ...

        DispatchQueue.main.async {
            self.persons = newData
        }
    }
}
Since this data is going to trigger a UI update after a background network call, it is important that changes to the @Published property get switched to the main thread.
The PersonViewModel also needs to be Observable with the editable properties marked as @Published.
class PersonViewModel: Identifiable, ObservableObject {
    // Even though this is not observed directly,
    // it must be an ObservableObject for the data flow to work

    var id = UUID()
    @Published var first: String = ""
    @Published var last: String = ""
    @Published var phone: String = ""
}
The odd thing was the way that I had to pass the data to the detail view. This is what I tried initially:
  List {
      ForEach(personList.persons) { person in
          NavigationLink(destination:
              PersonDetailView(person: person)
          ) {
              Text("\(person.first) \(person.last)")
          }
      }
  }
And in PersonDetailView:
@ObservedObject var person: PersonViewModelThis almost worked. The correct data was passed to the detail view, and the data edits changed the data, but the parent list was never re-drawn. If I changed a record's first name then went back to the list, the change was not displayed. But if I then returned to the detail view for the same record, my edits were there, so I could tell that the data was changing correctly. The problem was how to change it in such a way that the parent view was notified of the change.
Trying to bind person with PersonDetailView(person: $person) gave the error Use of unresolved identifier '$person', so the ForEach enumeration did not provide a direct connection to the personList object.
The solution I came up with was to switch to enumerating by index in the ForEach and passing a direct member of the parent list's data to the detail view. And switching the PersonDetailView to use @Binding var person: PersonViewModel.
ForEach(0 ..< personList.persons.count, id: \.self) { index in
    NavigationLink(destination:
        PersonDetailView(person: self.$personList.persons[index])
    ) {
        Text("\(self.personList.persons[index].first)") +
          Text(" \(self.personList.persons[index].last)")
    }
}
This works but as well as being hard to read, it has one major flaw. The rows in the table are identified by their row number, rather than by anything in the data like the person.id. This can really mess with how SwiftUI handles the List and how it knows which rows have changed and need to be re-rendered. It is important to identify rows by something unique to the data in each row so that SwiftUI knows that you have deleted the row with the ID "abcd-1234" and not row #7. Because if you delete row ID "abcd-1234" there is no longer a row ID "abcd-1234" but if you delete row #7, there is now a different row #7 and anything could happen.
Update 1: @StewartLynch contacted me to suggest a much neater way to pass the person data to the PersonDetailView by using a function to get a Binding<PersonViewModel> for each person being displayed. This worked perfectly and made for a much cleaner looking bit of code. Thanks Stewart.
ForEach(personList.persons) { person in
    NavigationLink(destination:
        PersonDetailView(person: self.selectedPerson(id: person.id))
    ) {
        Text("\(person.first) \(person.last)")
    }
}
And outside the body declaration:
func selectedPerson(id: UUID) -> Binding<PersonViewModel> {
    guard let index = self.personList.persons.firstIndex(where: { $0.id == id }) else {
        fatalError("This person does not exist.")
    }
    return self.$personList.persons[index]
}
If you want to have a look at Stewart's solution, check out this commit on GitHub.
Update 2: @vadimshpakovski says that creating a binding for every person object is inefficient and that the function to create this binding will slow things down. He suggests using onReceive to react to changes to person and trigger an update of personList. In this case, PersonDetailView uses @ObservedObject var person: PersonViewModel. This also works perfectly.
  ForEach(personList.persons) { person in
      NavigationLink(destination:
          PersonDetailView(person: person)
              .onReceive(person.objectWillChange) { _ in
                  self.personList.objectWillChange.send()
              }
      ) {
          Text("\(person.first) \(person.last)")
      }
  }
If you want to have a look at Vadim's's solution, check out this commit on GitHub.
Update 3: More suggestions have come in from the community (thanks to everyone who contributed) and it has been pointed out to me that while Vadim's solution does solve a lot of the issues, it means that the entire ForEach has to be recalculated to check for changes every time a single Person is edited. And it also inserts model management code into the view code, which is not great.
So my next attempt goes back to using @Binding var person: PersonViewModel in PersonDetailView but instead of PersonListModel having an array of PersonViewModels, it has an array of UUIDs and a dictionary of UUID: PersonListModel. The benefit of this is that the UUIDs can be used in the ForEach as they are unique to each row, and the dictionary can be used to provide a Binding to the person for each UUID.
This removes the problem of my original solution by identifying each row uniquely, it goes back to Stewart's solution but eliminates the potential slow function to create a binding for the matching person, and eliminates the issue of complete redraws and model management inside views from Vadim's suggestion.
But it was not entirely straight-forward as getting a value from a dictionary by key returns an optional. At first I thought I could use the new default syntax for dictionaries to get a non-optional value for binding but for some reason that couldn't be used to create a Binding.
The answer was to write an extension on Dictionary with a subscript function that returns a non-optional value or gives a fatal error. Since I am in control of the data and set up every UUID with a matching PersonViewModel, this is not dangerous.
So here is what we have now:
class PersonListModel: ObservableObject {
    // Main list view model
    // ObservableObject so that updates are detected

    @Published var ids: [UUID] = []
    @Published var persons: [UUID : PersonViewModel] = [:]

    func fetchData() {
        // get data from web ...

        DispatchQueue.main.async {
          let personViewModels = dataArray.map { PersonViewModel(with: $0) }.sorted() {
              $0.last + $0.first < $1.last + $1.first
          }
          self.ids = personViewModels.map { $0.id }
          self.persons = Dictionary(
              uniqueKeysWithValues: personViewModels.map { ($0.id, $0) }
          )
        }
 }
The incoming data is mapped to a sorted array of PersonViewModels before extracting the UUIDs and creating the dictionary. This means that the UUIDs array is in the correct sort order for use in the ForEach.
Here is the Dictionary extension:
extension Dictionary where Key == UUID, Value == PersonViewModel {
    subscript(unchecked key: Key) -> Value {
        get {
            guard let result = self[key] else {
                fatalError("This person does not exist.")
            }
            return result
        }
        set {
            self[key] = newValue
        }
    }
}
And these go together to allow this:
ForEach(personList.ids, id: \.self) { id in
    NavigationLink(
        destination: PersonDetailView(person: self.$personList.persons[unchecked: id])
    ) {
        Text("\(self.personList.persons[unchecked: id].first)") +
            Text(" \(self.personList.persons[unchecked: id].last)")
    }
}
This ended up a bit more complicated than my original idea, but I think it is now good SwiftUI, avoiding several problems from the earlier solutions.
Thanks to JSON Generator for the sample data. And if anyone has any other solutions to this problem, I would love to hear it. You can contact me using any of the buttons at the end of this article.
@EnvironmentObject
Think of the EnvironmentObject a piece of state that can be used by any view or any descendent of the view once it has been introduced. People who have used React or any of the similar web development technologies will be familiar with the concept of global state and this is similar to that, although not truely global.
You set up a class as an EnvironmentObject model exactly as you would set up an ObservableObject with the same protocol conformance and using the @Published property wrapper to mark properties whose changes will trigger UI updates. Here is a very simple example with just one property.
class UserSettings: ObservableObject {
    @Published var isLoggedIn: Bool = false
}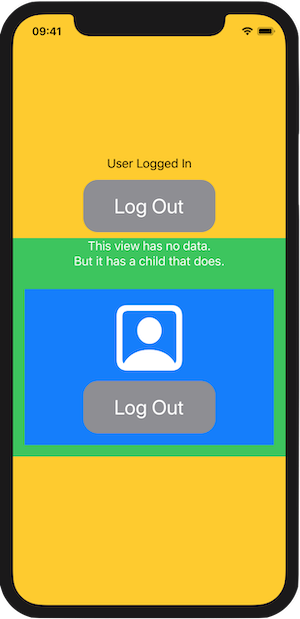
In this example, the yellow view is the parent view - the different views have different brightly colored backgrounds to make them easy to distinguish. The yellow view has access to the UserSettings like this:
struct NestingViews: View {
    @EnvironmentObject var userSettings: UserSettings

    var body: some View {
        ZStack {
            Color.yellow.edgesIgnoringSafeArea(.all)

            VStack {
                // UI omitted for space reasons

                // display first nested view
                ChildView()
            }
        }
    }
}
The ChildView contained in this parent - the green view - has no need to access this data and so gets no @EnvironmentObject property. But ChildView contains another subview - the blue one. And this GrandChildView does need access to the UserSettings so it has the exact same @EnvironmentObject var userSettings: UserSettings property as the parent view.
If this was using @ObservedObject the data would have to be passed through every view in an un-broken chain, even though ChildView did not need this data. By using @EnvironmentObject the chain can be broken, but any view that needs to, can access and mutate this data. In the example, both the yellow and the blue views display and edit the same data with updates happening in both when either button is pressed.
One key thing to remember about previewing @EnvironmentObject in the Canvas is that every view that uses it, or that contains a view that uses it, needs to be supplied with the ObservableObject in the preview using .environmentObject().
struct NestingViews_Previews: PreviewProvider {
    static var previews: some View {
        NestingViews()
            .environmentObject(UserSettings())
    }
}
In the app itself, only the first view to access the @EnvironmentObject needs it set. In this example, it is done in the NavigationLink that goes to the NestingViews example. The .environmentObject can be provided to the root view in the SceneDelegate if the root view needs it.
    NavigationLink(destination: NestingViews().environmentObject(UserSettings())) {
        ListContents(title: "@EnvironmentObject", imageNumber: 6)
    }
Summary
Or What Should I Use When?
- For value-based data models or data primitives, use
@State. - For reference-based data use
ObservableObject. - For data needed by a lot of views in your app, use
@EnvironmentObject. - Use
@Bindingor@ObservedObjectto pass data to a view that can mutate it.
And one final tip: while creating a view from scratch, use @State with sample, hard-coded data. Once you have the interface you want, then change it to use real data.
I am sure people will develop their own theories and their own ways of using SwiftUI, but those are the guidelines that I intend to follow for now. If you have different views and would like to discuss them, please contact me.