Playing in the Mac App Sandbox
23rd March 2026 • 3,178 words • 15 minutes reading time.
Every app running on any Apple device, including a Mac, runs inside a sandbox by default. This system keeps the app's data and settings isolated from other parts of the system so they cannot interfere with each other. As a Mac app developer, this is usually what you want to do, but sometimes the default sandbox settings do not allow your app to operate the way you need. In many cases you can work around this by adjusting the sandbox, but for some apps, you have to turn off sandboxing.
In this article, I want to walk through what the sandbox does by default, how you can configure its settings for various tasks, when you need to turn it off and why it's actually a good idea.
Table of Contents
- What does the Mac App Sandbox do?
- App Sandbox Settings
- Temporary Entitlements
- When You Must Turn Off the Sandbox
- Why Use the Sandbox At All?
What does the Mac App Sandbox do?
In Xcode, create a new macOS app project that uses Swift and SwiftUI. Add a button that calls this function:
func saveTestString() {
  let docsUrl = URL.documentsDirectory
  let fileUrl = docsUrl.appendingPathComponent("save_test.txt")

  let saveString = """
    This is a test.
    Where do you think it will it save?
    """

  try? saveString
    .write(
      to: fileUrl,
      atomically: true,
      encoding: .utf8
    )
}
The first two lines construct a URL based on the Documents directory. The function then tries to write a test string to this URL.
So the question is: where does this file end up? If you were expecting it to be in your Documents folder, you'd be disappointed.
Run the app or refresh the SwiftUI Preview and click the button. Now let's go and find the file...
In Finder, hold down Option and open the Go menu. Select Library and when the window opens, locate and open the Containers folder. My app is called Sandbox, so in Containers, I see a folder called Sandbox that has a single folder called Data. And here's where things get interesting.
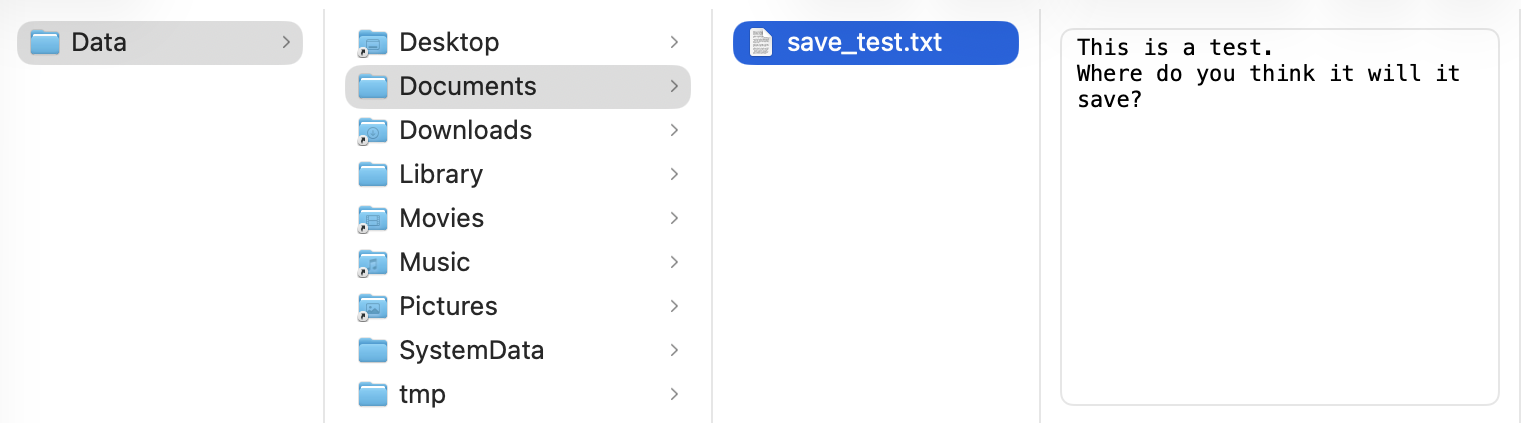
The folders where the icons have a small black arrow at the bottom left are aliases to your actual Desktop, Downloads etc. The folders with the standard folder icon are specific to this app and they are stored inside the container so that the app can't over-write any other app's data. The default sandbox settings allow your app to read and write any files here.
Your app's settings are stored in the Library/Preferences folder inside this Data folder. You should write any app data to these folders.
App Sandbox Settings
To see the available settings for your app's sandbox, go back to Xcode and select the project at the top of the Project navigator (press Command-1 if this isn't visible). Next, click on the app target and select Signing & Capabilities along the top to see several sections, including the one for the App Sandbox:

There are four groups of settings, so let's step through them:
Network
You'll almost never need to change the Incoming Connections (Server) option. This is for running a server that needs to accept connections from other devices.
The Outgoing Connections (Client) option is one you'll probably use a lot. As you would expect, if your app connects to the internet in any way, you need to enable this. But there is another use case that might surprise you.
If your app contains a web view of any kind, you need to enable this option, even if the web view is only used to display local content from inside your app.
I added a WebView and WebPage to a new tab in my sample app and asked it to load a static HTML string. When I ran the app, nothing appeared in the web view and the console showed these unhelpful warnings:
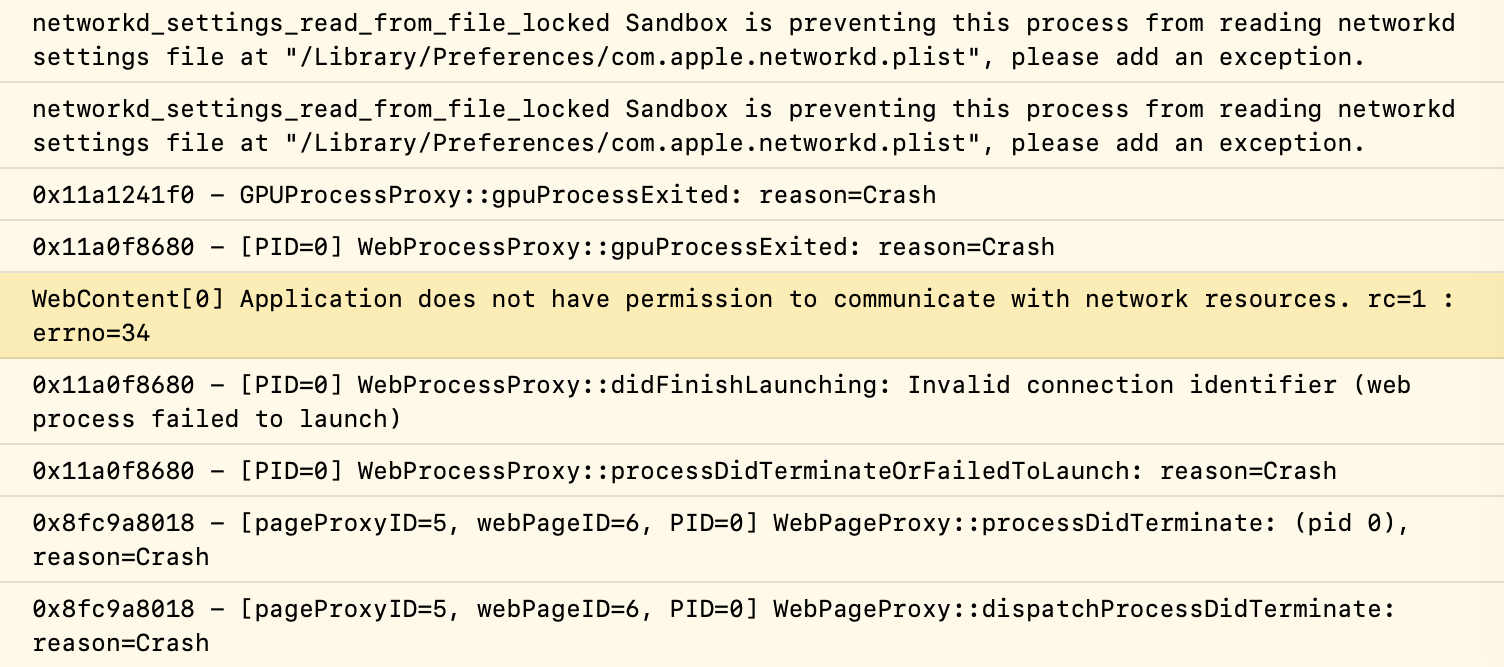
I think the one I have highlighted is the relevant one. When I enabled Outgoing Connections (Client) and tried again, I got even more warnings but this time, the web view showed my content.
Hardware
The hardware section lets you enable any extra hardware features that your app need access to. The only one I've ever used is Printing. The USB option does not need to be checked to allow standard peripherals like keyboards and mice to work, but if your app needs to communicate with a USB device directly, then enable this.
Similarly, if your app needs to record audio, take photos or connect to any Bluetooth devices directly, you need to enable the relevant options here.
If you enable any of these, click the + Capability button and search for a new capability for the option that you can use to explain to the user why the app needs this access.
App Data
Similar to the hardware settings, if your app needs to access the user's contacts, calendars or location, you need to enable that here.
In an iOS app, this is done using Privacy settings in the Info.plist where you have to give a reason for why your app wants access. For a Mac app, you just need to enable the relevant option in the sandbox settings and the system will prompt the user for permission when needed. As with the hardware settings, look for a new capability that can supply this information.
File Access
Now we get to the really interesting section. Ignoring the first option for now, the other four options give access to specific folders on the users system. You can choose to give your app no access by selecting None (the default), Read Only access or Read/Write access to any of these folders.
The top entry is the User Selected File option. This lets your app access any files and folders that the user has specifically selected. Again, you can selected Read Only or Read/Write access. But there are some oddities about this that need more explanation.
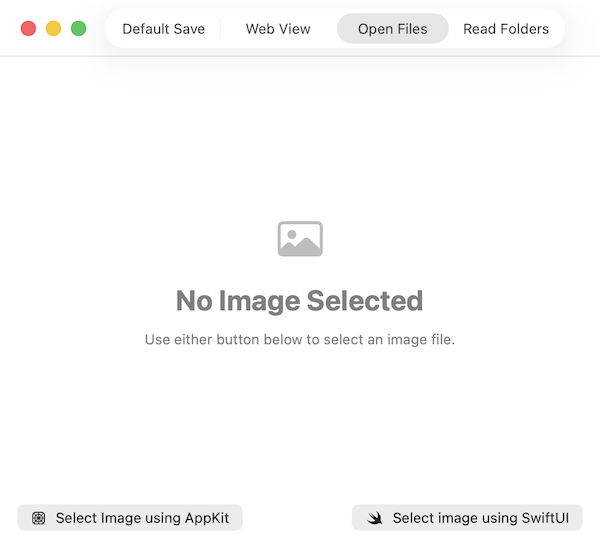
Leaving this at the default of Read Only, I'm going to add to my sample app. I added another tab which has its own view - OpenFilesDemo. This contains an AsyncImage that loads an image from an optional URL and two buttons:
Using NSOpenPanel
The first button uses AppKit to show a file dialog and use it to populate the image URL. Here's the function that it calls:
func selectAppKit() {
  let panel = NSOpenPanel()
  panel.allowedContentTypes = [.image]
  panel.message = "Select any image file…"

  imageUrl = nil

  panel.begin { response in
    if response == .OK, let url = panel.url {
      imageUrl = url
    }
  }
}
This uses AppKit's NSOpenPanel to show a file dialog. It's configured to allow only image files to be selected. When the user selects a file, the URL is stored in imageUrl. This optional URL is already connected to the AsyncImage, so when it is set, the image will load. It's cleared before showing the panel to make sure that the image does a complete refresh, even if there's an error or the same image is selected again. This method works perfectly and the selected image appears.
Using fileImporter
Now on to the SwiftUI technique that uses a fileImporter modifier. First, set up a Boolean to toggle the visibility of the file importer:
@State private var showFileImporter = falseThe second of the buttons clears imageUrl and sets this Boolean to true so that the file importer sheet appears. To create and configure the importer, I added this modifier to the view:
.fileImporter(
  isPresented: $showFileImporter,
  allowedContentTypes: [.image]
) { result in
  switch result {
  case .success(let url):
    imageUrl = url
  case .failure(let error):
    print("Image import failed: \(error.localizedDescription)")
  }
}
As with the NSOpenPanel, this restricts the user to selecting image files. The completion handler receives a Result with the selected URL if successful or an error if something went wrong. Again, I assigned the selected URL to imageUrl so that the image will load into the AsyncImage. But this time, when I run the app and select an image, nothing appears. The console shows this error:
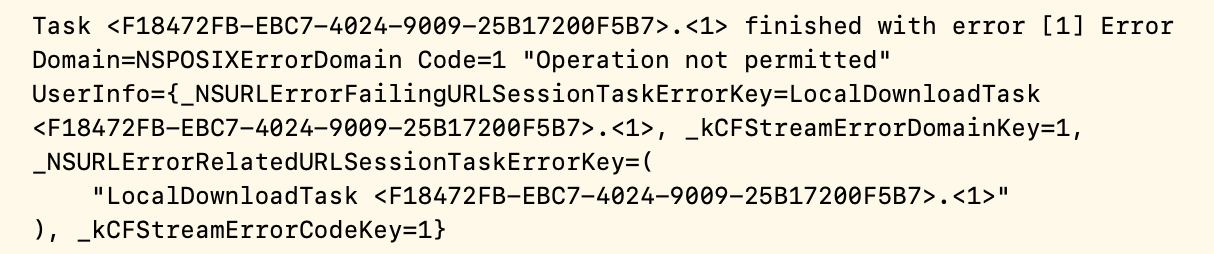
As with so many Xcode warnings, this doesn't really help but the docs for fileImporter are more useful. It turns out that NSOpenPanel returns a usable URL but when you use fileImporter inside a sandboxed app, it gives you a security-scoped bookmark which you cannot use requesting access from the system.
I updated the .success case to this:
case .success(let url):
  let gotAccess = url.startAccessingSecurityScopedResource()
  if gotAccess {
    imageUrl = url
  }
And now the image appears when using either button. However the Xcode docs are very insistent that every call to startAccessingSecurityScopedResource() must be balanced with a call to stopAccessingSecurityScopedResource() or your app will leak kernel resources. I'm not sure what effect that will have but it sounds bad...
Because I'm using an AsyncImage, I can't stop the access immediately after setting the URL because the image will not have finished loading and that would mean the URL became unavailable before it had been used. Instead, I added an onAppear modifier to the Image inside the AsyncImage:
.onAppear {
  imageUrl?.stopAccessingSecurityScopedResource()
}
Because the imageUrl property is cleared every time, this runs whenever a new image appears. It doesn't matter whether the URL is security-scoped or not - this works either way.
Saving URLs
Before moving on from this topic, there is one more issue that effects URLs no matter how they are selected and that's if you want to save them for re-use next time the app runs. Lets say we want to store the selected image URL and re-display that image when the app is launched again.
In a non-sandboxed app, this is easy - change the imageURL property from using @State to @AppStorage and it just works.
// @State private var imageUrl: URL?
@AppStorage("imageUrl") var imageUrl: URL?
But with the sandbox in the way, this becomes a whole lot more complicated, so I reverted this change, re-sandboxed the app and tried again.
You have to create a security-scoped bookmark from the URL and save that instead of saving the URL itself. First, I added an @AppStorage property to hold the bookmark, which is Data and not a URL:
@AppStorage("storedBookmark") private var storedBookmark: Data?Then I added a method to convert the URL to a bookmark and save it:
func saveBookmarkData(for url: URL) {
  if let bookmarkData = try? url.bookmarkData(options: .withSecurityScope) {
    storedBookmark = bookmarkData
  }
}
This uses a URL method to convert the URL into bookmark data with the .withSecurityScope option. If this succeeds, I store the bookmark data in storedBookmark which is saved in AppStorage. In a production app, I'd put this inside a do/catch block and handle any errors that might occur, but I'm trying to keep the demo code as concise as possible.
To use this, I amended the onAppear for the Image inside the AsyncImage:
.onAppear {
  if let imageUrl {
    saveBookmarkData(for: imageUrl)
    imageUrl.stopAccessingSecurityScopedResource()
  }
}
This checks for a valid imageUrl and if found, saves the bookmark data and only then stops accessing the resource.
The strange thing about this is that it only works if the sandbox setting for User Selected File is set to Read/Write instead of Read Only. I don't see why this should be so, but it is.
With this in place, I added a method to re-load the image from this stored bookmark:
func loadImageUrlFromBookmark() {
  guard let storedBookmark else {
    return
  }

  var isStale = false
  guard let url = try? URL(
    resolvingBookmarkData: storedBookmark,
    options: [.withSecurityScope],
    relativeTo: nil,
    bookmarkDataIsStale: &isStale
  ) else {
    return
  }

  let gotAccess = url.startAccessingSecurityScopedResource()
  if !gotAccess {
    return
  }

  imageUrl = url
  if isStale {
    saveBookmarkData(for: url)
  }
}
This is rather more complicated than the saving method!
First, check for data in storedBookmark and return if there isn't any. Then try to resolve this data back into a URL, using the security scope option that was used when saving the bookmark. The resolvingBookmarkData method reports if the URL is stale meaning that the file has moved or been deleted since you saved it. And again, this should be in a do/catch block with error handling.
If there is a URL, it's security scoped so try to start accessing it and if that fails, return. If it succeeds, assign the URL to imageUrl so that the image will load. Finally, if the bookmark was stale, create a new bookmark from the updated URL and save it.
To call this, I added a modifier to the VStack:
.onAppear(perform: loadImageUrlFromBookmark)So now we have a technique that saves and loads URLs in a sandboxed app - hurray!
If you want to test the isStale part, run the app and select an image. Then quit the app and move the image file to a different folder. When you run the app again, it will load the image from the new location which is pretty amazing, in my opinion.
Temporary Entitlements
So far, I've covered the standard features that you can enable as required inside the sandbox. There is another category called temporary entitlements, which you can request in an entitlements file. Although these are listed as temporary, I think that's just so that Apple can feel free to shut them down at any time. They do not expire and have to be renewed.
There's a rather old page in Apple's developer documentation that describes these: AppSandboxTemporaryExceptionEntitlements.html. The most common one (and the only one I have ever used) is the one that requests file access to a particular folder. In my Man Reader app, I search for man pages in the /opt/ and /usr/ folders so I request read-only access to those two paths.
To demonstrate this, I added another tab to the sample app with buttons that try to read from these folders using this method:
func readFiles(in folder: String) {
  let fileManager = FileManager.default

  do {
    let contents = try fileManager.contentsOfDirectory(atPath: folder)
    filesList = contents
  } catch {
    print(error)
  }
}
This time I am using a do/catch so that I can see the errors, and when I test using the current sandbox settings, I get this:

So now we need to add an entitlements file to the project.
Apple has made this more difficult over the years. Previously, Xcode created an entitlements file for every project so it was there to be edited. Now it doesn't exist so you have to create it manually which is a multi-stage process.
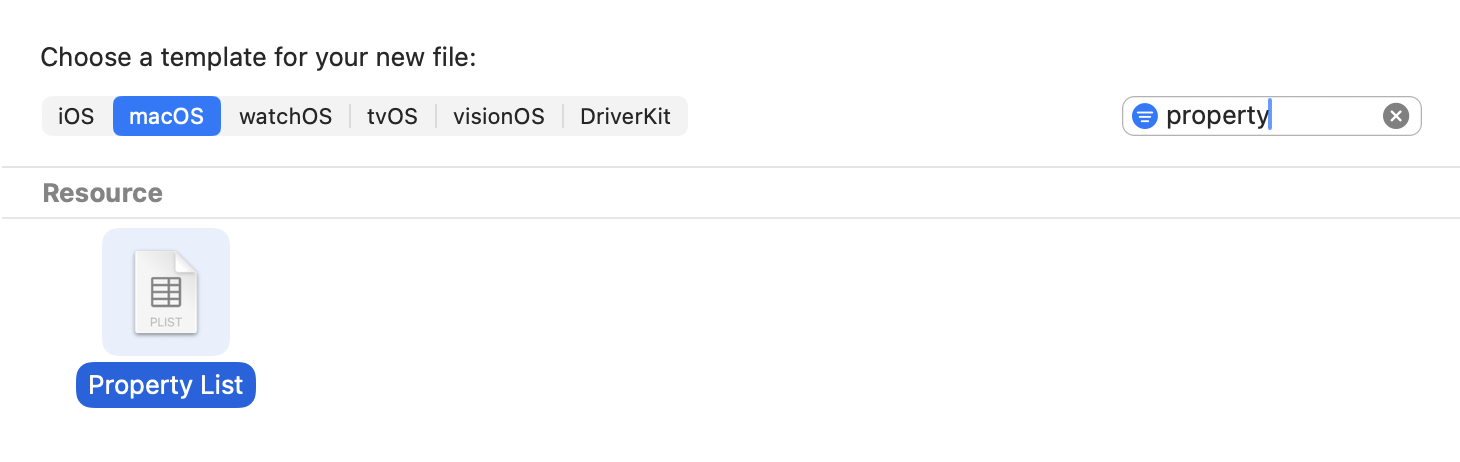
First, we have to add a new file to the project. Select the Sandbox folder in the Xcode project navigator - this is the second entry from the top and selecting it ensures your entitlements file will be where it should be. Use Command-N to open the file template chooser and search for property to find the Property List template:
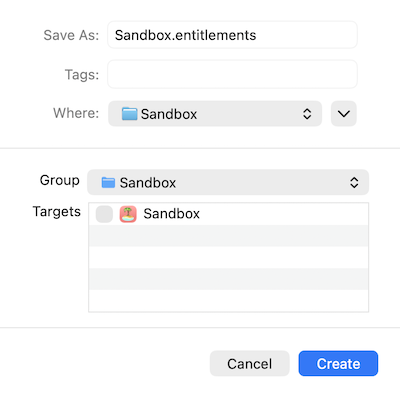
Click Next and change the name of the file to Sandbox.entitlements - make sure you change the file extension from the default .plist to .entitlements. Un-check the target - this file will not be part of the target app bundle, it's used by Xcode when building the app:
Now that the entitlements file has been created, we need to add the temporary exception for file access. Open the file and add a new array with the name com.apple.security.temporary-exception.files.absolute-path.read-only. Then add two String items to this array with the values /usr/ and /opt/.
In Property List edit mode, it will look like this:
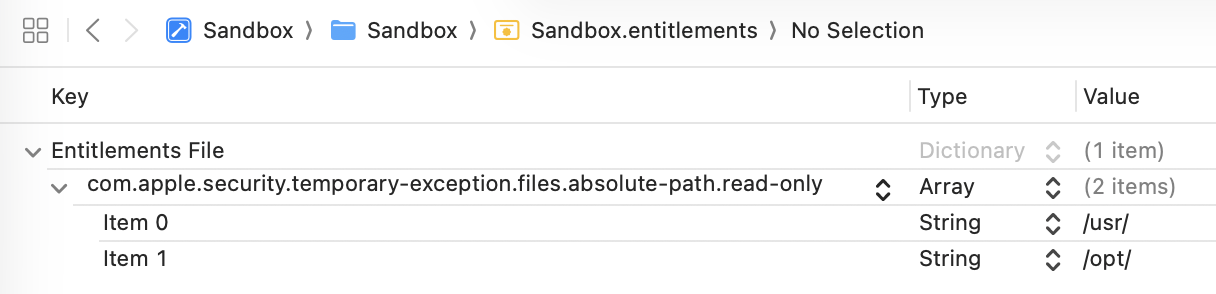
If you want to check it or prefer to edit as text, right-click on the file in the Project navigator and select Open As > Source Code to see the XML:
<?xml version="1.0" encoding="UTF-8"?>
<!DOCTYPE plist PUBLIC "-//Apple//DTD PLIST 1.0//EN" "http://www.apple.com/DTDs/PropertyList-1.0.dtd">
<plist version="1.0">
<dict>
	<key>com.apple.security.temporary-exception.files.absolute-path.read-only</key>
	<array>
		<string>/usr/</string>
		<string>/opt/</string>
	</array>
</dict>
</plist>
The final stage is to tell Xcode to use this entitlements file. Select the project at the top of the Project navigator, then select the app target and go to Build Settings. Select All at the top and then search for entitlements to find the Code Signing Entitlements entry.
Double-click to the right of this entry to popup an edit box and type in Sandbox/Sandbox.entitlements - this is the path to the entitlements file that we just created, relative to the project folder:
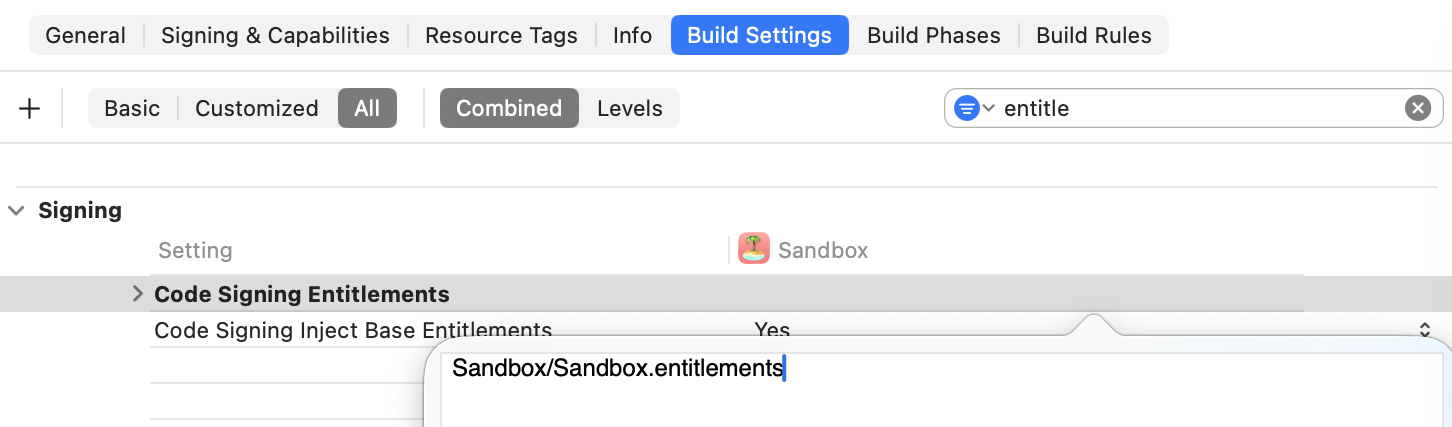
The edit box doesn't show a cursor or any indication that you can edit it, but start typing and it will work. Press Return to apply your change.
Finally, run the app again, try to read the contents of the /usr/ or /opt/ folders and it works!
I used the folders I needed access to as examples. You would need to specify exactly what temporary entitlements you need for your app. Also, when submitting to App Store review, tell them why you need these and the reviewers will be more likely to approve your app.
When You Must Turn Off the Sandbox
So far, I've shown how to make the sandbox work for you, by adjusting settings and using entitlements. But there are some cases where you just have to turn it off.
To do this, go to Signing & Capabilities and click the trash button at the top right of the App Sandbox section. You can always add it back using the + Capability button if you change your mind later.
In my experience, I have only had to turn off the sandbox when I needed to use command-line tools that are reading or writing files outside the sandbox. For example, in my macOS Apps Step by Step book, one of the apps uses the sips command-line tool to edit image files. sips needs to read and write files as specified by the user, but because it's operating outside the app, it doesn't inherit the sandbox permissions that the app has. In this case, I had to turn off sandboxing for the app.
Your experience will differ but sometimes this is the only way to allow your app to do what you need.
Why Use the Sandbox At All?
So after over 2,000 words on how to work around all the sandbox limitations, you're probably wondering if it's worth the effort. Why not just turn it off and make everything easier?
There are two main reasons to use the sandbox, even if it causes some extra work.
-
Only sandboxed apps can be distributed through the Mac App Store. This is not a deal-breaker because Mac apps can be distributed outside the App Store, but it's something to consider.
-
Sandboxing is a security feature that protects your app and your users. With your data and settings confined to their own container, there is little chance of any interference between your app, the system and any other apps, including any malware.
Apple is tightening the restrictions on what apps can be installed and run on a Mac by default. Even if you decide not to sandbox your app, I strongly recommend that you sign it and get Apple to notarize it so that it can be installed and run without the user having to put up with scary warnings and obscure activation steps. This doesn't require sandboxing but you do have need an Apple Developer account and the app's Signing & Capabilities settings must include the Hardened Runtime capability.
My recommendation is to start every project with the sandbox enabled and using all the default settings. Enable extra permissions only as you need them. Add entitlements if the settings do not allow what you need. Only turn off sandboxing if there is no other way to make your app work.
If you have any feedback about this article, please contact me using one of the links below or through the Contact page. And if you found this useful, please buy me a coffee.
All the sample code from this article is on GitHub so download it and you'll see the rest of the code that was too long to fit in the article. Thanks to Stewart Lynch for his Icon Composer Lite app which I used to create the sample app icon.