The Mac Menubar and SwiftUI
17th February 2025 • 1,396 words • 8 minutes reading time.
When you create a Mac app using SwiftUI, you get the standard Mac menubar by default. The commands modifier lets you customize the menu bar, either by adding, replacing or removing items and menus. You can even add some presets which give a consistent way to add groups of common items.
The problem comes when you want to communicate back to the SwiftUI views from the menubar. How can you direct your menubar commands to the correct destination? AppKit uses the responder chain, so it effectively broadcasts any menubar message until something handles it. This might be an edit field, a view, a window or even the app itself. SwiftUI doesn't work like this, but I've explored multiple possibilities for passing messages from the menubar to the active window.
My usual approach is to use NotificationCenter to send messages. This takes a few steps to set up.
NotificationCenter
Start by defining a name for your custom notification, like this:
extension Notification.Name {
  static let menuSelected = Notification.Name("menuSelected")
}
Then, in your menu item's action, post the notification like this:
NotificationCenter.default.post(name: .menuSelected, object: nil)Add an object if you want the notification to be more specific. This allows you to combine several menu items into a single notification name.
Now, you need to add a listener as a property of your SwiftUI view, receiving it on the main run loop so that UI updates are handled correctly:
let menuSelectedNotification = NotificationCenter.default
  .publisher(for: .menuSelected)
  .receive(on: RunLoop.main)
Finally, add an onReceive modifier to your view, with a closure to process the notification:
.onReceive(menuSelectedNotification) { notification in
  // process the notification, checking for the object if you added one
  if let stringObject = notification.object as? String {
    // do something with the string
  } else {
    // do something else
  }
}
The main issue with this is that it broadcasts the message to all instances of the view, so if you have multiple windows open and displaying this view, they'll all receive and process the notification. There are cases where this will be valid - maybe changing the theme of the complete app or setting something else which effects every open window. But mostly, you only want to send the message to the active window.
You can improve this by using the appearsActive environment value to see if the current view is active. Truncated for ease of reading, ContentView now looks like this:
struct ContentView: View {
  @Environment(\.appearsActive) private var appearsActive

  let menuSelectedNotification = NotificationCenter.default
    .publisher(for: .menuSelected)
    .receive(on: RunLoop.main)

  var body: some View {
    // UI defined here

    .onReceive(menuSelectedNotification) { notification in
      guard appearsActive else { return }

      if let stringObject = notification.object as? String {
        // process the new string
      }
    }
  }
}
The onReceive closure starts with a guard to check that the view is active. If it's not, the closure returns immediately.
Note: You may have used controlActiveState for this in the past, but it has been deprecated in favor of appearsActive which is easier to use as it's a Boolean instead of an enum.
This looks like exactly what we need, but there's a problem. If you merge multiple windows into tabs, the appearsActive property will be the same for all the tabs in the window.
So basically, this only works if you disallow tabbing for your windows, so it's not a complete solution.
Failed Attempts
My next attempt was to step into AppKit and have NSApp send a selector through the responder chain. This looked like it should work, but I could never get it to, and it looked clunky
Looking though an Apple tutorial, it appears that they prefer to use @FocusedBinding and focusedValue. This worked in their sample app, but there was something different about my data structure that meant it never worked for me, even after extracting my data into a separate data type.
Then I came across focusedSceneObject. This required me to create an @ObservableObject data type, but then it worked perfectly, even in tabbed windows. But this is not viable going forward, as I have switched to using Observation. However the docs did point me in the right direction.
Success at Last
After a bit of research and a lot of testing, I finally came up with a complete solution, using @FocusedBinding and focusedSceneValue.
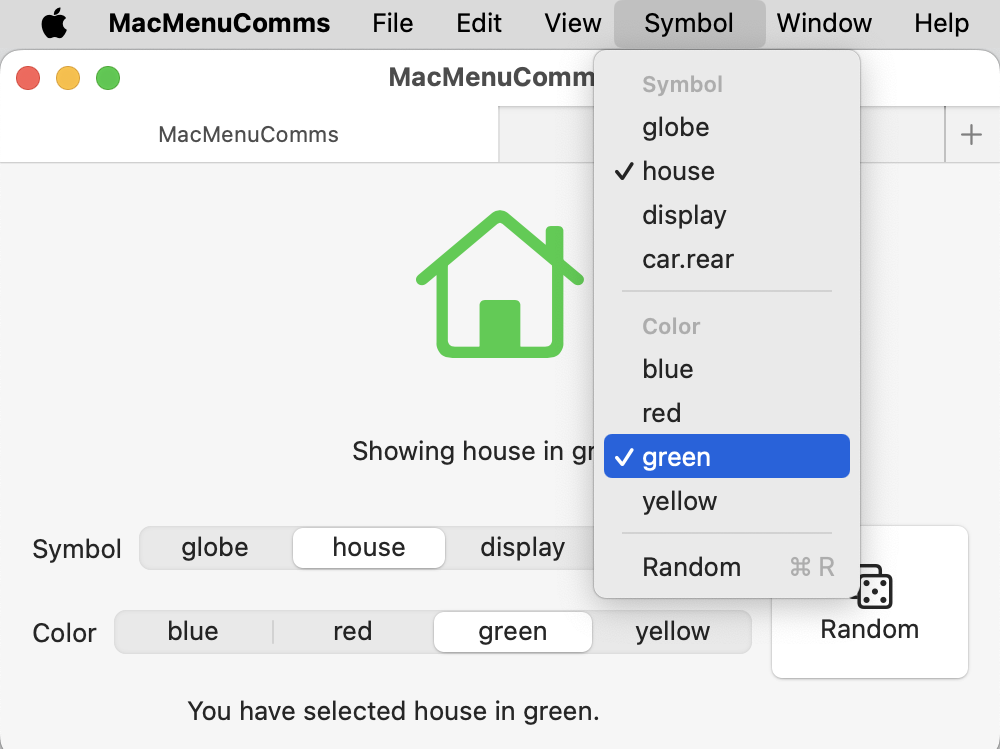
First, you need a data object to handle your menu messages. This can be a struct or an observable class. My sample app has both in Symbol.swift with one commented out, so you can test this. The data model has properties for an icon and a color and you can also have it choose a random icon and color. For convenience, it has two static arrays to provide the names and colors for the menus and pickers.
struct Symbol {
  var name = "globe"
  var color = Color.blue

  mutating func chooseRandomSymbolAndColor() {
    // choose random values
  }
}
Or as a class:
@Observable
class Symbol {
  var name = "globe"
  var color = Color.blue

  func chooseRandomSymbolAndColor() {
    // choose random values
  }
}
Next, you need to extend FocusedValues so it has a key to your data type. This has become a lot less verbose with the new @Entry macro. The binding must be to an optional:
extension FocusedValues {
  @Entry var selectedSymbol: Binding<Symbol>?
}
In your ContentView (or wherever you're using this property), set the data property as the focusedSceneValue for this key:
struct ContentView: View {
  @State private var symbol = Symbol()

  var body: some View {
    VStack {
      // UI defined here
    }
    .focusedSceneValue(\.selectedSymbol, $symbol)
  }
}
The last step is to use this in the menu (again, truncated for brevity):
@main
struct MenuDataApp: App {
  @FocusedBinding(\.selectedSymbol) var selectedSymbol

  var body: some Scene {
    WindowGroup {
      ContentView()
    }
    .commands {
      CommandMenu("Symbol") {
        Menu("Symbol") {
          ForEach(Symbol.names, id: \.self) { name in
            Button(name == selectedSymbol?.name ? "✔︎ \(name)" : name) {
              selectedSymbol?.name = name
            }
          }
        }
        .disabled(selectedSymbol == nil)

        Button("Random") {
          selectedSymbol?.chooseRandomSymbolAndColor()
        }
        .keyboardShortcut("r")
        .disabled(selectedSymbol == nil)
      }
    }
  }
}
The important features here are the @FocusedBinding property at the top and the fact that the menu items use optional chaining to access this property if it exists. If you have no open windows, this will be nil, otherwise it will point to the instance of the data property in the active window.
To improve the user experience, I added a disabled modifier to the menus and the button so that the menus are not active unless there's a valid selectedSymbol. Unfortunately, you can't disable an entire CommandMenu.
The wonderful part of this is that it works with windows and tabbed windows. Hurray!
Showing the Current Selections in the Menu
The ugly part is that the menu item indicating the current choice is set to show a check mark manually, instead of using the standard menu checkmark. But you can't bind a @FocusedBinding property to a Picker as it's selection.
My solution was to use a Picker with a local state property. Then I track for changes to the @FocusedBinding property and to the local property. When either changes, the other is set to match, remembering that the @FocusedBinding property may be nil:
It was important to add the onChange modifiers to the ContentView. I tried them on the Picker first, but they only got updated as the menu opened.
I've updated the project, thanks to Malcolm Hall who added this comment:
onChange is just for external actions. For linking states its Binding and it has an init that handles conversion from optional, that allows you to access the keypath binding to the symbol's colour and name you were missing.
Now, the picker code looks like this (I omitted the color picker to make for a shorter and more readable code block):
if let selectedSymbol = Binding($selectedSymbol) {
  Picker("Symbol", selection: selectedSymbol.name) {
    ForEach(Symbol.names, id: \.self) { name in
      Text(name)
        .tag(name)
    }
  }
  .pickerStyle(.inline)
} else {
  Text("Symbol")
}
I also made the pickers inline for better visibility. With this version, I really like the way the menus use a Text view to display the header with no possible selections, when there's no selectedSymbol.
So this is my new technique for communications between the menubar and SwiftUI. It takes a bit of setting up, but then it works really well. For a more complex app, I might need more bindings, or I could merge the relevant data objects in a larger struct or class.
Going back to Apple's example which used @FocusedBinding and focusedValue, I think this worked because they had a NavigationSplitView and the focused value was the selected item, so there was an object to focus on. From the Apple's docs for focusedSceneValue:
Use this method instead of focusedValue(::) for values that must be visible regardless of where focus is located in the active scene.
This is what solved it for me because there was no real focus element in my view. I was able to go back to the Apple sample app and get it working using focusedSceneValue instead of focusedValue, so I think this is a solid technique.
I'm sure there are other ways to do this, so if you have an alternative method or can suggest any improvements to my technique, I'd love to hear about it.
The Code
The sample project is available on GitHub. Check out the main branch for the final version of the code, but explore the other branches to see my experiments along the way.
Here they are, in order of progress:
- basic_ui: The starter version of the app with the UI set up for selecting an icon and a color.
- menu: Menus added but not working.
- notifications: Using
NotificationCenterto send menu messages. - focusedSceneObject: Works but only with
@ObservableObjectdata types. - main: The technique I've settled on with
@FocusedBindingandfocusedSceneValue
You can contact me using one of the links below or through the Contact page. And if you found this article useful, please buy me a coffee.