To-Day
8th March 2023 • 1,625 words • 8 minutes reading time.
When I sit down at my computer at the start of a work day, I typically like to plan out the broad outline of my work. This is the three or four major tasks for my day. I don't want a minute-by-minute plan, just a list of the major items, so that I can check them off as I work, and get to the end of the day without feeling like I've forgotten anything.
There are a ton of todo apps and web services available, but they all provide much more than I need. When I factored in how I wanted to learn about writing a Mac menubar app in SwiftUI, the solution was obvious - write my own.
First things first: the project is open-source and on GitHub so feel free to download it, fork it, edit it, create pull requests, file issues or whatever you like. If you just want to install the app, you can download the disk image. It requires macOS 13.0 or later.
I'm not going to go through the entire app in detail. You can download the project and check out the code to see it all. I'm just going to give some details about the app structure and architecture as well as mentioning some code that I found new or interesting.
The App
I've written menu bar apps using AppKit but this is my first serious look at SwiftUI's MenuBarExtra. Configuring the app to be a menu bar app has three steps:
- Remove the
WindowGroupfrom your appbody. - Add a
MenuBarExtrato your appbodywith some views to show in the menu. - Insert an entry into Target - Info, setting
Application is agent (UIElement)toYES.
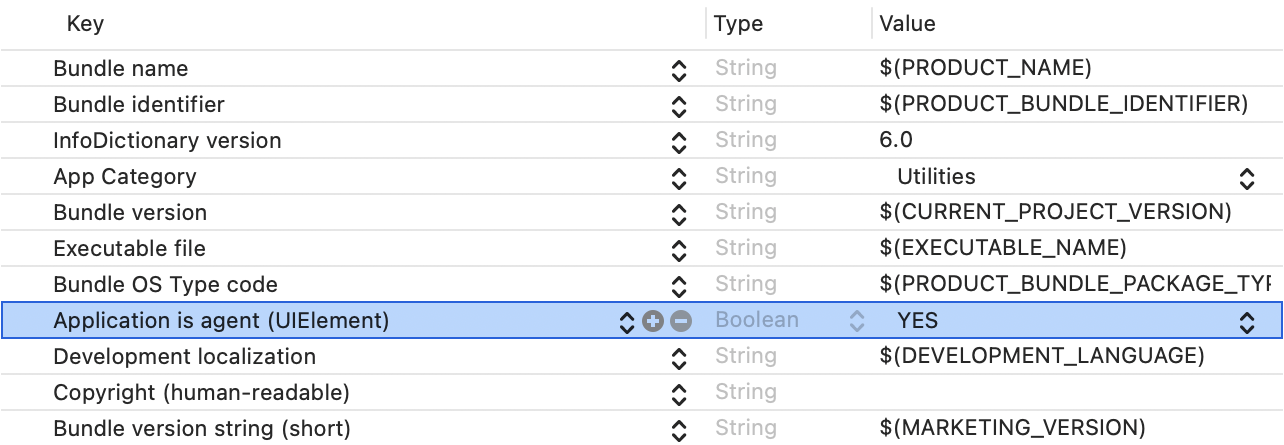
You can then delete ContentView.swift from the project since nothing uses it.
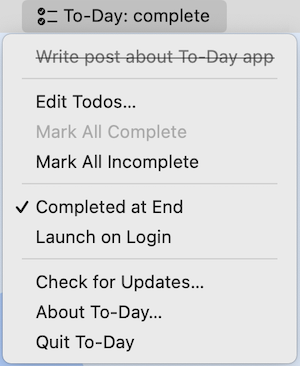
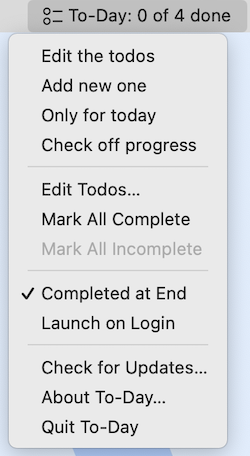
Looking at the first screenshot, you can see that I've split the menu into four sections. The first one displays the actual todos and handles checking them off. This view is provided by the main data object.
The other sections are static and deal with editing the todos, configuring the app settings and managing the app itself. Each of these is split off into a separate view file to keep the main app body as uncluttered as possible. The files for these three sections are in the Menu Views group in the Xcode project.
Editing the todos caused the most issues with the app and took several iterations, but I'm pleased with this version:
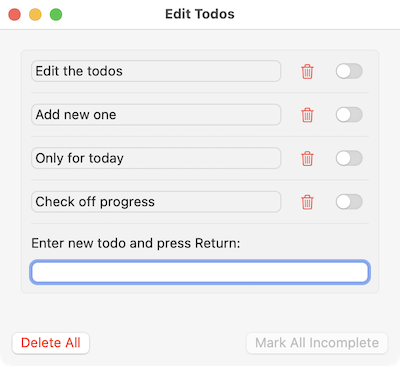
I tried lots of ways of tracking the focus and adding keyboard commands to move items up and down the list but in the end, I went for simplicity. The editing is embedded in a Form. This means that I get the standard tabbing behaviour by default, but I also get the small toggle switches, which I really like.
The main view for this is EditView and it, with its subviews, are in the Edit Views project group.
I'll discuss the Models group and the data flow in a minute, but to finish describing the app structure, the AboutView tells you more about the app. I love being able to use basic Markdown styling in Text views. And I learnt a good lesson: if you're having trouble with truncated text, check out the fixedSize modifier.
Finally, Updater is a class to handle using the Sparkle updater, which deserves its own post. I must have made every possible mistake when implementing this, so I think a guide would be useful, for future me if for nobody else.
The Data
I like to use the VOODO pattern, which stands for View - ObservableObject - DataObject. Working backwards through this, the DataObject is a struct that contains the properties for a single Todo item. The ObservableObject is a class called AppState that contains a published array of todo items as well as a DataStore struct for saving and loading. The View is the menu itself.
AppState also contains a bunch of computed properties to make life easier and methods for adding, deleting and checking. It also has a computed property to generate the view for the todos at the top of the menu.
When you have an ObservableObject, you can pass it around the app in two ways: as an ObservedObject or as an EnvironmentObject. Both work fine, but with the ObservedObject, there has to be an unbroken chain of data passing from view to subview to sub-subview and so on. EnvironmentObject makes it easier because once you insert it into a view hierarchy, any view in that hierarchy can access it.
It might seem like EnvironmentObject is less efficient, but I've read recent reports of it using less memory, perhaps because intermediate views that don't need it, don't access it.
I decided to use EnvironmentObject so in the App struct, I initialised it as a StateObject. MenuBarExtra can't take an environmentObject, so I grouped the menu view sections and assigned the environmentObject to the Group. This let the views in the menu access it using @EnvironmentObject var appState: AppState.
Windows
Even though this is a menu bar app, I wanted to be able to open two windows: one for editing the todos and one for showing some info about the app.
For each of these, I added a Window scene to the app. A Window scene differs from a WindowGroup in that it only opens one copy of the window. If you try to to open it a second time, it activates the original rather than opening another.
Back of these windows has a title and an id. The id is used by the openWindow Environment value to show the window and the title is the window title. The contents of the scene is the view that appears in the window.
The Edit window also gets the EnvironmentObject so it can access the data. Both have a defaultSize - this only applies to the first opening - after that, the app uses whatever you set. The About window also gets a defaultPosition (which I am not sure works) and a windowResizability modifier to make sure that the window can't be bigger than the size needed to show the content.
Launch on Login
Getting an app to launch when the user logins in used to be a lot of work. Thankfully, we now have access to SMAppService which makes it much easier. And that's why the app is only for macOS 13 or higher.
To tell whether an app is set to launch on login, import the ServiceManagement library and run this code:
SMAppService.mainApp.status == .enabledAnd to change the setting, use:
try SMAppService.mainApp.register()Or:
try SMAppService.mainApp.unregister()The really neat thing about this is that people can now see what apps will launch on login, unlike with the previous system where this data was hidden deep in the Library folder. Go to System Settings - General - Login Items to check it out.
Saving Changes
I wanted to save the todos whenever the user made a change, but with a debounce so it didn't save after every keystroke.
After a bit of research, this is what I used:
var saveTask: DispatchWorkItem?

func debouncedSave() {
  self.saveTask?.cancel()

  let task = DispatchWorkItem { [weak self] in
    DispatchQueue.global(qos: .background).async { [weak self] in
      if let self {
        self.dataStore.saveTodos(todos: self.todos)
      }
    }
  }

  self.saveTask = task
  DispatchQueue.main.asyncAfter(deadline: DispatchTime.now() + 0.5, execute: task)
}
I added a didSet property observer to the todos array, which calls this function after every change. This cancels any existing task, creates a new one and schedules it for half a second later. If no other changes occur in that half-second, the app saves, using a background queue.
The DataStore struct saves and loads the data as JSON, storing it in the Documents folder inside the app's Container.
Distribution
Typically, I use the App Store to distribute my apps. Apple handles all the business side of things and it makes distributing updates easy.
But lately, it seems that the App Store review process has become even more capricious, blocking good apps for spurious reasons, while utterly failing in their stated mission of "keeping us safe" from obvious scams, copycat apps and fake reviews.
So for this app, I have decided not to charge for it and to distribute it myself. I'm using GitHub both as the open-source repository, and as the app distribution source.
If you enjoy using the app, I'd love to hear from you. There are contact details at the bottom of the page. And if you really want to contribute, please buy me a coffee.
Updating is the missing piece in this puzzle, but that is a sufficiently large topic that I intend to write a follow-up post detailing how I set up Sparkle and eventually got it to work.
Conclusion
So, how does this compare with writing a Mac menu bar app in AppKit? A lot of things are easier in SwiftUI, but one thing I miss is being able to set up a menu delegate to track when the menu is opened or closed. There doesn't appear to be any way to do this for a MenuBarExtra - it can't have an onAppear or onDisappear modifier and scenePhase detects nothing.
For this app, it's not really a problem, but I have used other apps where it would be a real showstopper.
And what's next for this app? I'll use it in my daily routine for a while and see what I like, what I hate and what extra features I'd like. One possibility is to add some global shortcuts. This requires hooking into the Accessibility settings, which I am reluctant to do, so I'll need to think about this.
If you have any ideas or feature requests, create an issue on GitHub, or fork and edit the project and then create a pull request.