SwifUI Mac Menus
24th January 2021 • 1,283 words • 7 minutes reading time.
With the option to create apps using the SwiftUI App life cycle, we get a new way to set up menus in Mac apps. This post will explore some of the ways to do this as well as look at the default menu groups that Apple gives us.
When you create a new Mac app, the standard menu items are included for you. Using the commands modifier on the WindowGroup allows you to add new menus, add new menu items and to replace or remove existing menu items.
Adding a New Menu
To add a completely new menu, you can use CommandMenu, supplying it with a title and the contents to display.
After starting this process, the App.swift file looks like this:
@main
struct MenuSamplesApp: App {
	var body: some Scene {
		WindowGroup {
			ContentView()
		}
		.commands {
			CommandMenu("Custom Menu") {
				// no contents yet
			}
		}
	}
}
So what can be put inside the menu? We are used to only being allowed to use NSMenuItems but with SwiftUI there are no such things. It turns out that you can put quite a few SwiftUI views into a menu.
The most obvious is a Button with an action which appears like any standard menu item.
CommandMenu("Custom Menu") {
	Button(action: {
		print("Menu Button selected")
	}, label: {
		Text("Menu Button")
	})
}
I have found that the easiest way to pass this selection on to other views is via a notification. Buttons can be disabled and enabled just as usual.
The contents of the button will usually be a Text view, but it can include an Image view if you want to use an SFSymbol or any other image in the menu.
Button(action: {}, label: {
	Image(systemName: "clock")
	Text("Date & Time")
})
Apart from Buttons, there are several other SwiftUI Views that work in a menu. A very common use case in a menu is to have a switchable boolean setting that is displayed with a leading check mark if it is on.
This can be done using a Toggle view.
Toggle(isOn: $toggleSetting, label: {
	Text("Toggle")
})
I created a variable to hold the setting using @State but @AppStorage would be better if this setting needed to persist between launches. To respond to changes, you can use an onChange modifier.
This demonstrates one of the huge strengths of SwiftUI's declarative approach. You tell the compile you want a Toggle and it is automatically structured to fit the place and platform where it is being used.
A Picker is a good choice for allowing a single selection from multiple options. This makes a sub menu with check marks.
Picker("Appearance", selection: $pickerChoice) {
	Text("Dark").tag("dark")
	Text("Light").tag("light")
	Text("System").tag("system")
}
To make a sub-menu with standard menu items like buttons, use Menu.
Menu("Sub Menu") {
	Button(action: {}, label: {
		Text("Sub Item 1")
	})
	Button(action: {}, label: {
		Text("Sub Item 2")
	})
	Button(action: {}, label: {
		Text("Sub Item 3")
	})
}
Menu items are often best split up with a separator and this is done in SwiftUI by adding a Divider().
If you try a UI element in a menu and it doesn't work, it tends to show as disabled text and doesn't break the menu, so experiment. I was surprised to find that Link does not work in a menu.
Editing Existing Menus
I have covered creating a new menu, but what about adding new items to an existing menu?
In this case, use CommandGroup instead of CommandMenu. The difference is that instead of setting a title for the menu, you give it a placement option with a reference to an existing standard menu item.
Still inside the commands contents, start typing CommandGroup to see three options:
CommandGroup(after:, addition:)CommandGroup(before:, addition:)CommandGroup(replacing:, addition:)
In each case, the first parameter is a CommandGroupPlacement that specifies one of a limited range of standard menu items.
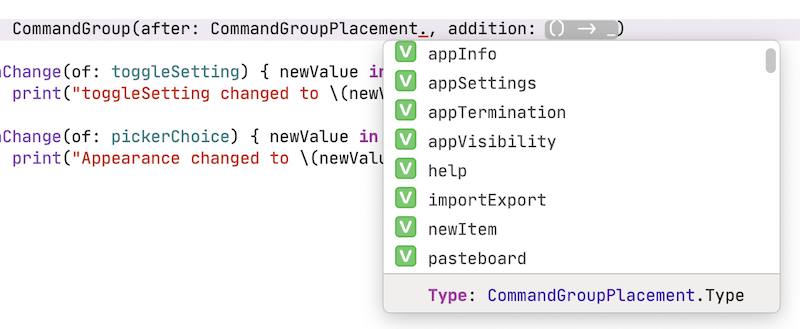
The options for the menu items inside a CommandGroup are just the same as when creating your own menu.
Removing a Standard Menu Item
If you really want to get rid of one of the default menu items (or groups of items), you can use CommandGroupPlacement and replace the existing one with an EmptyView(). This is probably not a great idea as regards the Human Interface Guidelines but it is an option if you need it.
CommandGroup(replacing: CommandGroupPlacement.appVisibility) {
	EmptyView()
}
You can also replace an existing menu item with your own version if you want to be able to respond to it in a more custom way. I can imagine doing this for the Help menu item as I do not like using Apple's Help system and prefer to direct users elsewhere.
Preset Menu Groups
If you watched my Back to the Mac talk called Build a Mac app inside 30 minutes using nothing but SwiftUI, you will have seen who I used a rather clunky function to dive into AppKit in order to stop the sidebar disappearing completely and permanently.
If you haven't watched it yet, go and take a look - I'll wait… If you made it this far, I assume you are a Mac app fan like me and I think you will enjoy the talk as it demonstrated a lot of SwiftUI Mac app techniques.
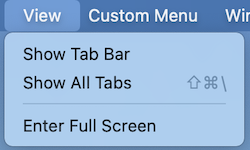
Since I recorded that video, I found out that Apple provides preset menu groups for dealing with certain things and one of them is for sidebars. My clunky solution is still useful if you want to have a toolbar button, but I think I would include the menu group as well.
There are five present Commands groups provided by Apple, four of which are useful and the fifth has a purpose that escapes me.
SidebarCommands()ToolbarCommands()
Inserting both these into your commands will expand the default View menu, so that it goes from this:
To this:
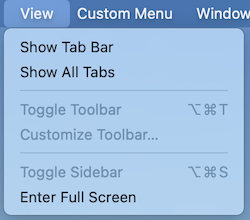
You do not need to include both, but it was easier to show in one screen shot instead of two.
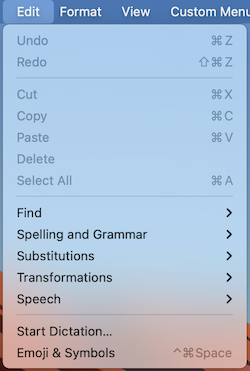
If your app allows any serious text editing, you are going to want to use:
TextEditingCommands()
Which changes the default Edit menu from this:
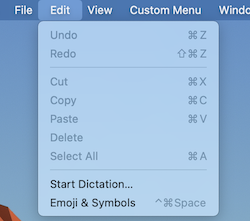
To this:
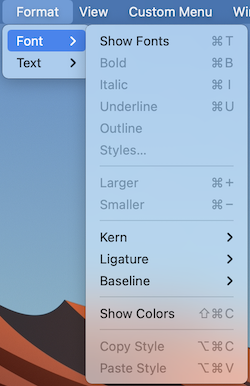
And if you need your users to be able to format text, including:
TextFormattingCommands()
adds in a Format menu.
And finally, there is EmptyCommands() which does nothing and has no obvious use.
These are used like this:
.commands {
	SidebarCommands()
	ToolbarCommands()
	TextEditingCommands()
	TextFormattingCommands()
}
Using a Separate File
If you are adding a lot of menus, you are probably starting to feel that your App.swift file is getting a bit crowded. You can separate out these menu commands into one or more separate files, so long as they are contained in a struct that conforms to the Commands protocol and which has a body that also conforms to Commands.
struct MenuCommands: Commands {
	@Binding var toggleSetting: Bool

	var body: some Commands {
		CommandMenu("Custom Menu") {
			Button(action: {
				print("Menu Button selected")
			}, label: {
				Text("Menu Button")
			})

			Divider()

			Toggle(isOn: $toggleSetting, label: {
				Text("Toggle")
			})
		}
	}
}
This struct cannot have its own data or you will get lots of warnings, but it can have bindings to data from its parent. Insert a call to this struct, and any others you have created, in the commands modifier, just like for the Apple presets.
@State private var toggleSetting = true

// ...

.commands {
	MenuCommands(toggleSetting: $toggleSetting)
	SidebarCommands()
}
Bonus: Credits
Every Mac app has an "About …" menu item which brings up a simple dialog box with basic app information: icon, app name and version number. These will always appear but there is an easy way to add more information underneath this info and it can include formatted text and links.
Create a new file called Credits.rtf - the New File dialog has a Rich Text File option. Anything in a file with this exact name will be shown below the standard information in the About box.
Xcode's RTF editor is not great, but it is good enough for this. There are some basic formatting tools above the text editor, but you can also right-click on text to get more options, including Font and Color panels.
To insert a web link, go to the Editor menu and select Add Link…
Well that's it. A quick round-up of the ways to use menus in your SwiftIU Mac apps. I hope you found it useful. If you have any suggestions, comments, corrections or improvements, please contact me using one of the links below or through the Contact page.