Consistent Swift Style
30th March 2018 • 1,510 words • 9 minutes reading time.
- Why is important to style your code?
- How do you decide on a style?
- Is there a way to enforce this style automatically?
What is style in Swift?
Style applies to writing in any programming language and refers to the way you structure your code.
For example, how to you arrange braces?
if theValue < 10 {
    // do one thing
} else {
    // do the other thing
}
or
if theValue < 10
{
    // do one thing
}
else
{
    // do the other thing
}
or anything in between?
Do you use camelCase or snake_case?
Do you always start class names with an uppercase letter?
And of course there is the Great Debate: tabs or spaces? And how many?
Why is important to style your code?
You only write code once, but you & others will read it many times.
As I tell students, in six months time some poor sucker is going to have to read this code, and worse still, that poor sucker might be you, so make it readable.
There is a cognitive load involved in reading code but you can lighten that load by using consistent patterns that your brain can recognise quickly without having to re-analyse them each time.
How do you decide on a style?
Do a search online for Swift style guide and you will get numerous results, although you do have to dodge the sites dedicated to Taylor Swift's dress sense! I like the Ray Wenderlich guide although its emphasis is on styles that read well in print and in web pages. The LinkedIn guide is also good. GitHub also has a style guide but it hasn't been updated recently. However it contains some good general advice.
But in the end, you have to decide your own style. The important thing then is to be consistent. I don't care whether you use camelCase or snake_case, tabs or spaces, but if you use a mixture your code will be harder to read, so pick a style and stick to it.
Is there a way to enforce this style automatically?
This is where SwiftLint comes into the picture. SwiftLint is a tool that can check your code and look for style violations. While it comes with a default set of rules, you can configure these rules to suit your own style.
Installing and Running SwiftLint
To install SwiftLint, I recommend using HomeBrew. Once you have HomeBrew installed, open Terminal and type brew install swiftlint. You can update it any time using brew upgrade swiftlint.
You can run SwiftLint directly from the Terminal. cd to the folder containing your Xcode project and type swiftlint. For a brand new iOS project, you will probably get a result similar to this:
Linting Swift files in current working directory
Linting 'ViewController.swift' (1/2)
Linting 'AppDelegate.swift' (2/2)
ViewController.swift:23: warning: Vertical Whitespace Violation: Limit vertical whitespace to a single empty line. Currently 2. (vertical_whitespace)
ViewController.swift:25: warning: Trailing Newline Violation: Files should have a single trailing newline. (trailing_newline)
AppDelegate.swift:16: warning: Vertical Whitespace Violation: Limit vertical whitespace to a single empty line. Currently 2. (vertical_whitespace)
AppDelegate.swift:44: warning: Vertical Whitespace Violation: Limit vertical whitespace to a single empty line. Currently 2. (vertical_whitespace)
AppDelegate.swift:46: warning: Trailing Newline Violation: Files should have a single trailing newline. (trailing_newline)
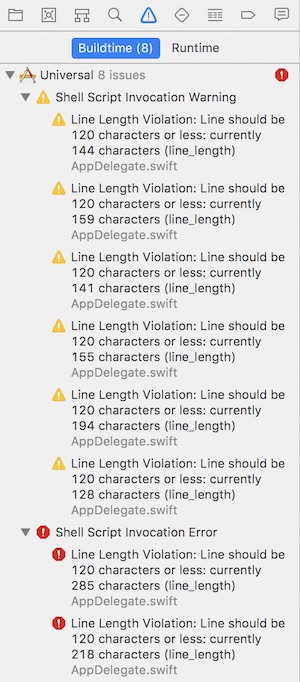
AppDelegate.swift:17: warning: Line Length Violation: Line should be 120 characters or less: currently 144 characters (line_length)
AppDelegate.swift:23: error: Line Length Violation: Line should be 120 characters or less: currently 285 characters (line_length)
AppDelegate.swift:24: warning: Line Length Violation: Line should be 120 characters or less: currently 159 characters (line_length)
AppDelegate.swift:28: error: Line Length Violation: Line should be 120 characters or less: currently 218 characters (line_length)
AppDelegate.swift:29: warning: Line Length Violation: Line should be 120 characters or less: currently 141 characters (line_length)
AppDelegate.swift:33: warning: Line Length Violation: Line should be 120 characters or less: currently 155 characters (line_length)
AppDelegate.swift:37: warning: Line Length Violation: Line should be 120 characters or less: currently 194 characters (line_length)
AppDelegate.swift:41: warning: Line Length Violation: Line should be 120 characters or less: currently 128 characters (line_length)
Done linting! Found 13 violations, 2 serious in 2 files.I have removed the full path that will be listed for each file just to make this fit better.
These reports show the file and line number, whether this is an error or a warning, a description of the error and the name of the SwiftLint rule that caused the warning or error.
You could now go through and fix each of these but there are 2 solutions to make things easier:
Try entering this in the Terminal window: swiftlint autocorrect.
Correcting Swift files in current working directory
Correcting 'ViewController.swift' (1/2)
Correcting 'AppDelegate.swift' (2/2)
ViewController.swift:22:1 Corrected Vertical Whitespace
ViewController.swift:23 Corrected Trailing Newline
AppDelegate.swift:15:1 Corrected Vertical Whitespace
AppDelegate.swift:43:1 Corrected Vertical Whitespace
AppDelegate.swift:43 Corrected Trailing Newline
Done correcting 2 files!
And now if you run swiftlint again you will only get Done linting! Found 8 violations, 2 serious in 2 files. and all the remaining issues are for Line Length Violation This shows that autocorrect cannot fix everything and while it is good on spacing, it has trouble with more complex issues. But it is still worth doing as it can do a lot of the tedious fixes that creep into Xcode projects.
Incorporating SwiftLint into Xcode
The next thing to do to make your life easier is to add SwiftLint to your Xcode project so that it can run automatically whenever you do a build.
Open your project in Xcode and select the project itself at the top of the Navigator on the left. Select the target for the main app and click the Build Phases tab along the top. Click the + button at the top left of the existing build phases and choose 'New Run Script Phase'. Expand the newly added phase and paste in the following script:
if which swiftlint >/dev/null; then
  swiftlint autocorrect
  swiftlint
else
  echo "warning: SwiftLint not installed, download from https://github.com/realm/SwiftLint"
fi
Your Xcode window should look something like this:
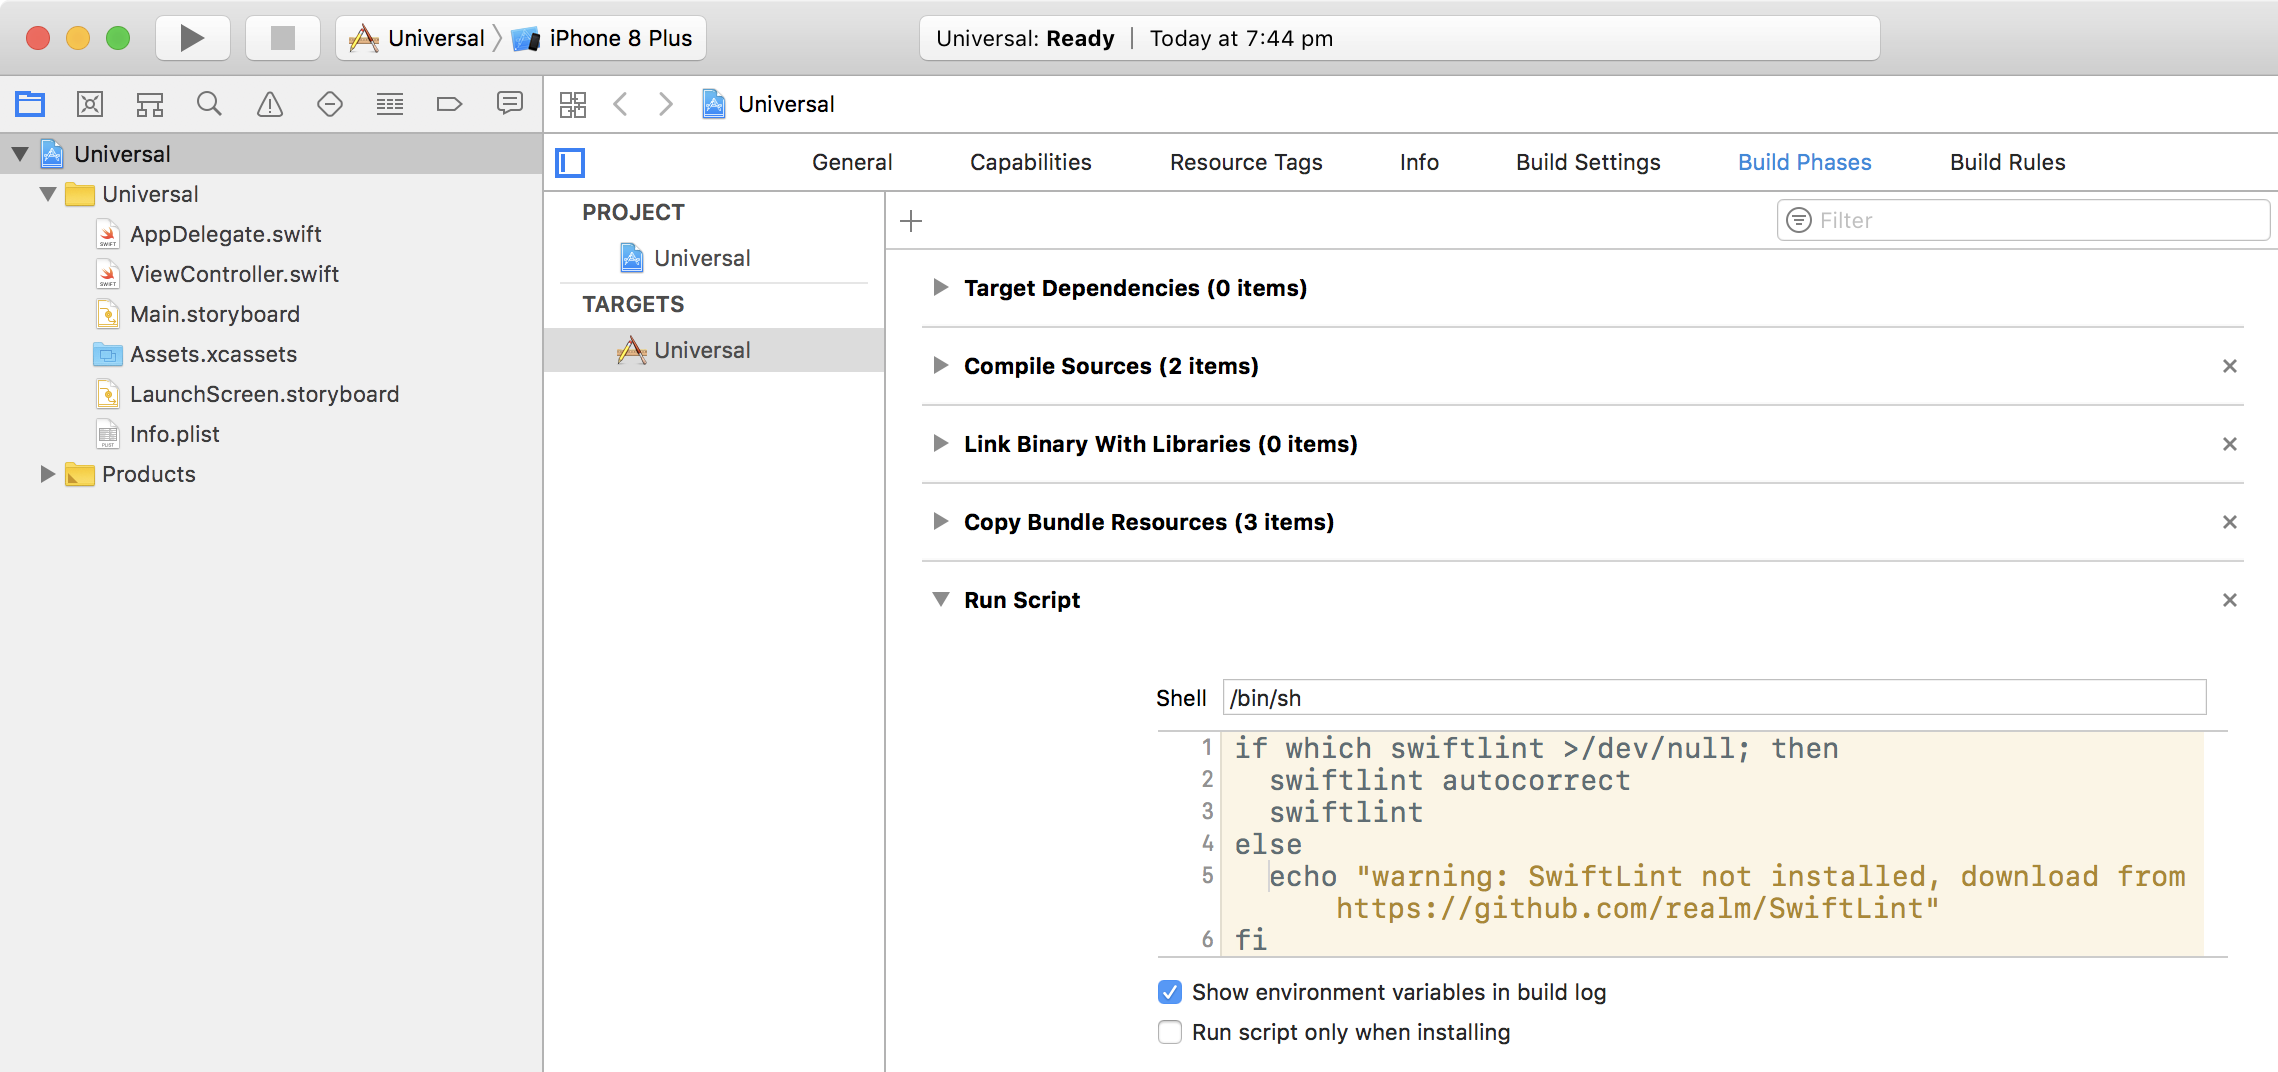
If you think this looks like it is running SwiftLint twice, you are correct. The first time through it corrects what it can and the second pass reports all remaining issues. This is still faster than manually correcting the easy stuff. So now you will see any violations in the Xcode issue navigator when you do a build and you can click the entry to go directly to the code.
Configuring SwiftLint
Now you are all set to SwiftLint all your code, but how do you decide what styles SwiftLint should enforce? Go back to Terminal, make the Terminal window as wide as possible and run swiftlint rules which will return a table like this (click to see full-sized image):
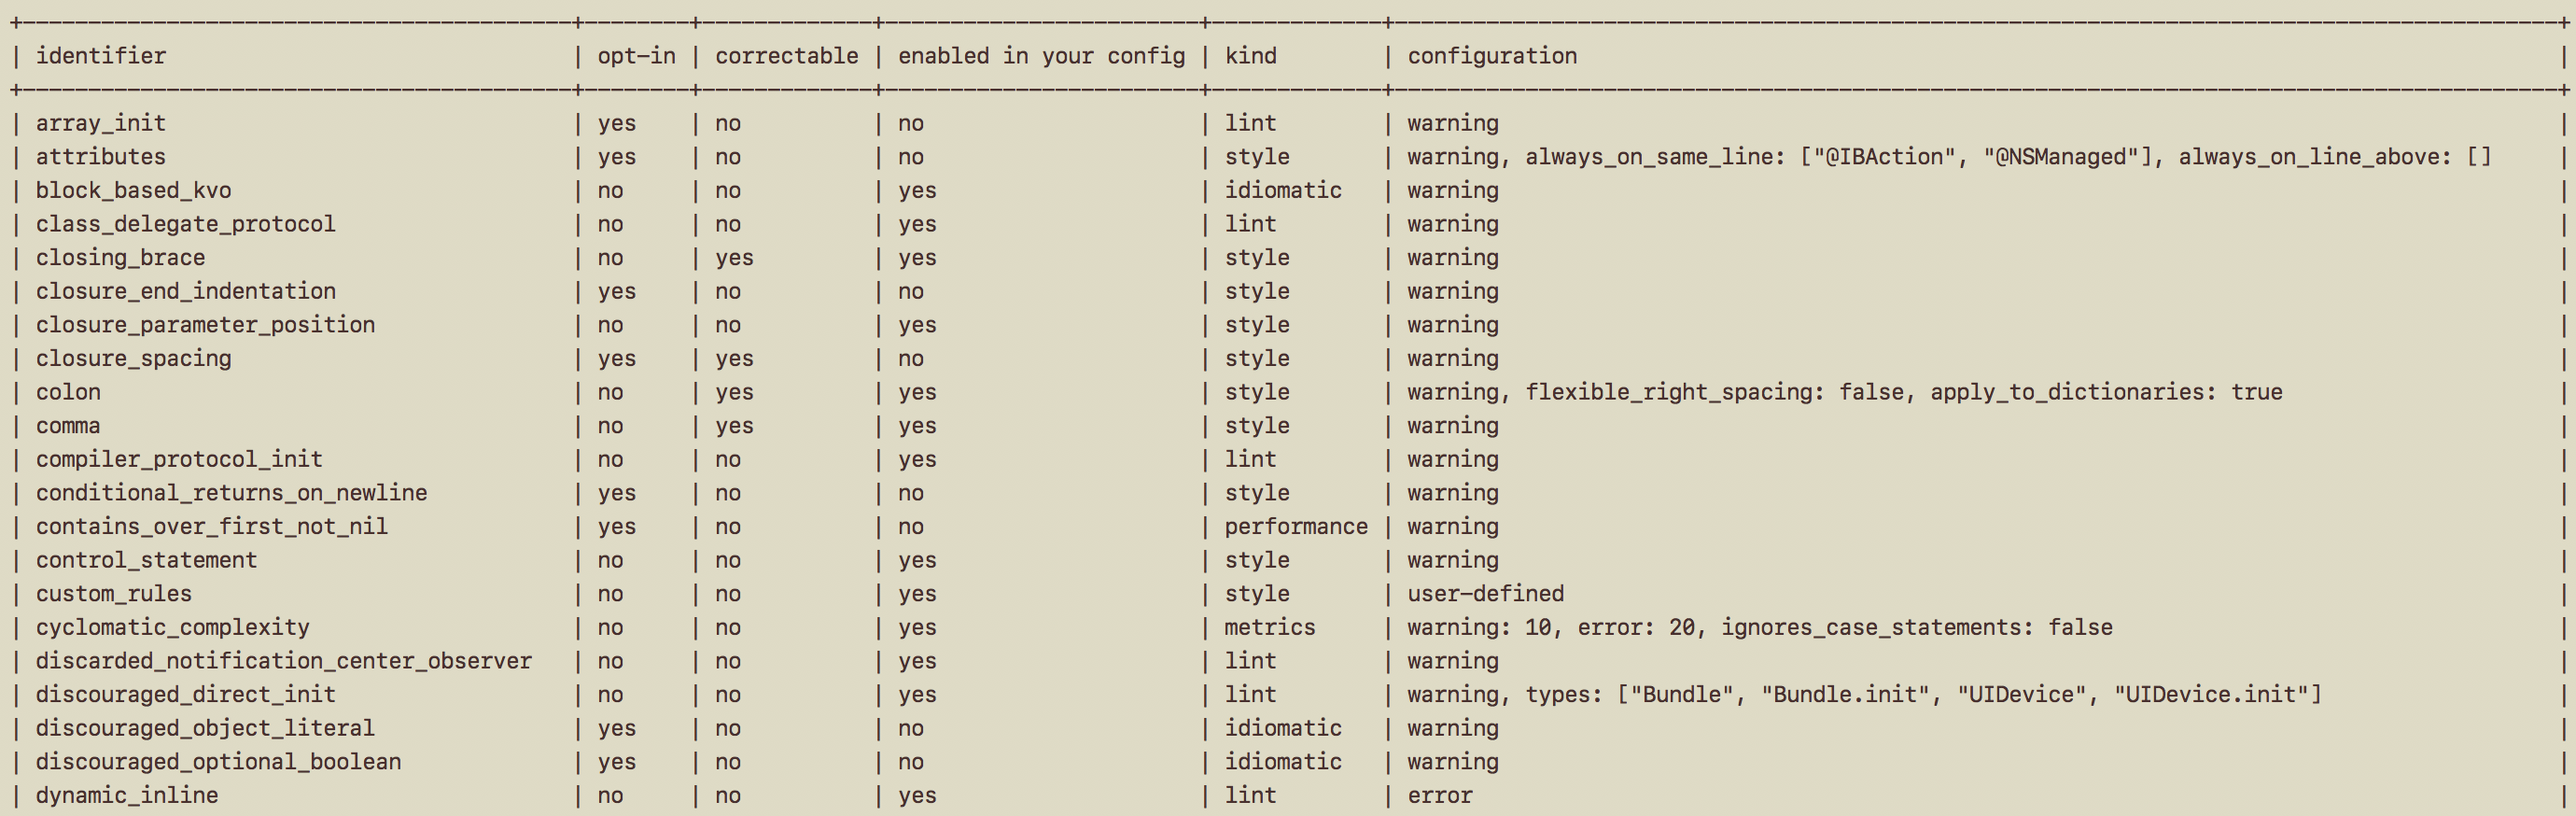
For details on what each rule does, check out the entries in Rules.md
As an example, look at the rules for line_length:
+------------------------------------------+--------+-------------+------------------------+-------------+---------------------+
| identifier                               | opt-in | correctable | enabled in your config | kind        | configuration       |
+------------------------------------------+--------+-------------+------------------------+-------------+---------------------+
| line_length                              | no     | no          | yes                    | metrics     | warning: 120, er... |
+------------------------------------------+--------+-------------+------------------------+-------------+---------------------+
And by making my Terminal window full width, I can see the configuration column contains warning: 120, error: 200, ignores urls: false, ignores function declarations: false, ignores comments: false.
- The rule name (identifier) is line_length - this is what appears in the issue navigator or Terminal.
- It is not an opt-in rule, meaning that it is enabled by default.
- It is not correctable by autocorrect.
- It is enabled in this configuration.
- And then comes the configuration:
- a line of more than 120 characters will generate a warning
- a line with more than 200 characters will generate an error and stop the build
- this rule will not ignore URLs, function declarations or comments
To set your own configurations, you need to create a .swiftlint.yml file in the same folder as your Xcode project. The leading period makes the file invisible, so you will need to create and edit it using Terminal.
In the Terminal, cd to the folder containing your Xcode project file and run touch .swiftlint.yml to create the invisible file. You can edit the file in Terminal using nano, vim or whatever you prefer, but you can also open it in any text editor. I prefer to use Atom so I open the file by running this command: atom .swiftlint.yml.
The SwiftLint ReadMe has a section about configuration which shows the format and the various general headings you can use, as well as how to configure an individual rule.
Here is my .swiftlint.yml file:
disabled_rules: # rule identifiers to exclude from running
included: # paths to include during linting. `--path` is ignored if present. takes precendence over `excluded`.
excluded: # paths to ignore during linting. overridden by `included`.
  - Carthage
  - Pods
opt_in_rules:
  - closure_end_indentation
  - closure_spacing
  - contains_over_first_not_nil
  - empty_count
  - explicit_init
  - fatal_error_message
  - force_unwrapping
  - literal_expression_end_indentation
  - multiline_arguments
  - multiline_parameters
  - operator_usage_whitespace
  - overridden_super_call
  - private_outlet
  - prohibited_super_call
  - trailing_closure
  - unneeded_parentheses_in_closure_argument
function_body_length:
  - 60 # warning
  - 100 # error
line_length:
  - 150 # warning
  - 200 # error
cyclomatic_complexity:
ignores_case_statements: true- No rules are disabled by default.
includedis blank which means it checks every folder...- ... except for the ones listed in the
excludedsection. opt-in-rules: I went through the list of rules withopt-inequal toyesand enabled all I thought useful.function_body_length- the default warning length is 40 but I allow myself 60 as that fits on my screen so I can always see the entire function without scrolling.line_length- with a bigger screen, I lengthen both the warning and error lengths.cyclomatic_complexitychecks for functions that are getting so complex that the compiler might run into trouble. I have this on with the default warning & error limits, but I set it to ignorecasestatements as they can often trigger this without really being too complex.
Now that my .swiftlint.yml file is edited, doing a build uses those settings and for a new iOS project, I am now down to 2 errors and 3 warnings, all due to long lines in AppDelegate.swift.
The other main way to configure SwiftLint is by disabling specific rules in my code.
As an example, I have an enum for direction:
enum Direction {
  case up, down, left, right
}
When I build this, SwiftLint gives a warning:
Identifier Name Violation: Enum element name should be between 3 and 40 characters long: 'up' (identifier_name)
This tells me that up is too short a word to use as an identifier according to the identifier_name rule. In this case, up is the obvious identifier to use, so I want SwiftLint to let it pass. But I don't want to check my configuration file, because I want it to catch other short identifier names.
The solution is to add this comment to my code, before the case line:
// swiftlint:disable next identifier_name
This tells SwiftLint to ignore the next identifier_name warning or error it sees and now my code builds without error.
Rules can also be disabled or enabled by file. Check out the Disable rules in code section of the SwiftLint ReadMe for more details.
What are the benefits?
For me, SwiftLint enforces a number of good habits:
- Files are kept relatively short.
- Functions are always small enough to fit on a single screen.
- Variable names & function names cannot be too short and non-descriptive.
- Braces, indentation and white-space are always consistent.
And sometimes the warnings make me think of a better way to do things.