Posting from my new iPad
17th June 2017 • 1,926 words • 9 minutes reading time.
Last week I got a 10.5” iPad Pro. I have had an iPad ever since the original release, but I have to confess to mainly using it for content consumption rather than creation. Since I am usually close to a Mac anyway, there didn’t seem a lot of point. But now that iOS 11 is really addressing the issue of making the iPad a "pro" device, I decided to give it a try.
So here I am, sitting in an armchair with my iPad on my lap, writing this post and working out the details as I go. Any typos are due to the cat trying to compete with the iPad for space on my lap!
iPad
As already mentioned, I have a new iPad Pro. I also have an Apple Pencil which I use for taking notes. I do not have a keyboard, so I am using the on-screen keyboard right now.
I don’t usually install beta versions of operating systems, but iOS 11 is a huge part of making the iPad more professional, so I have installed it. As you would expect, there are a few issues (apps quitting, layout issues especially when rotating) but so far I am loving it.
Writing
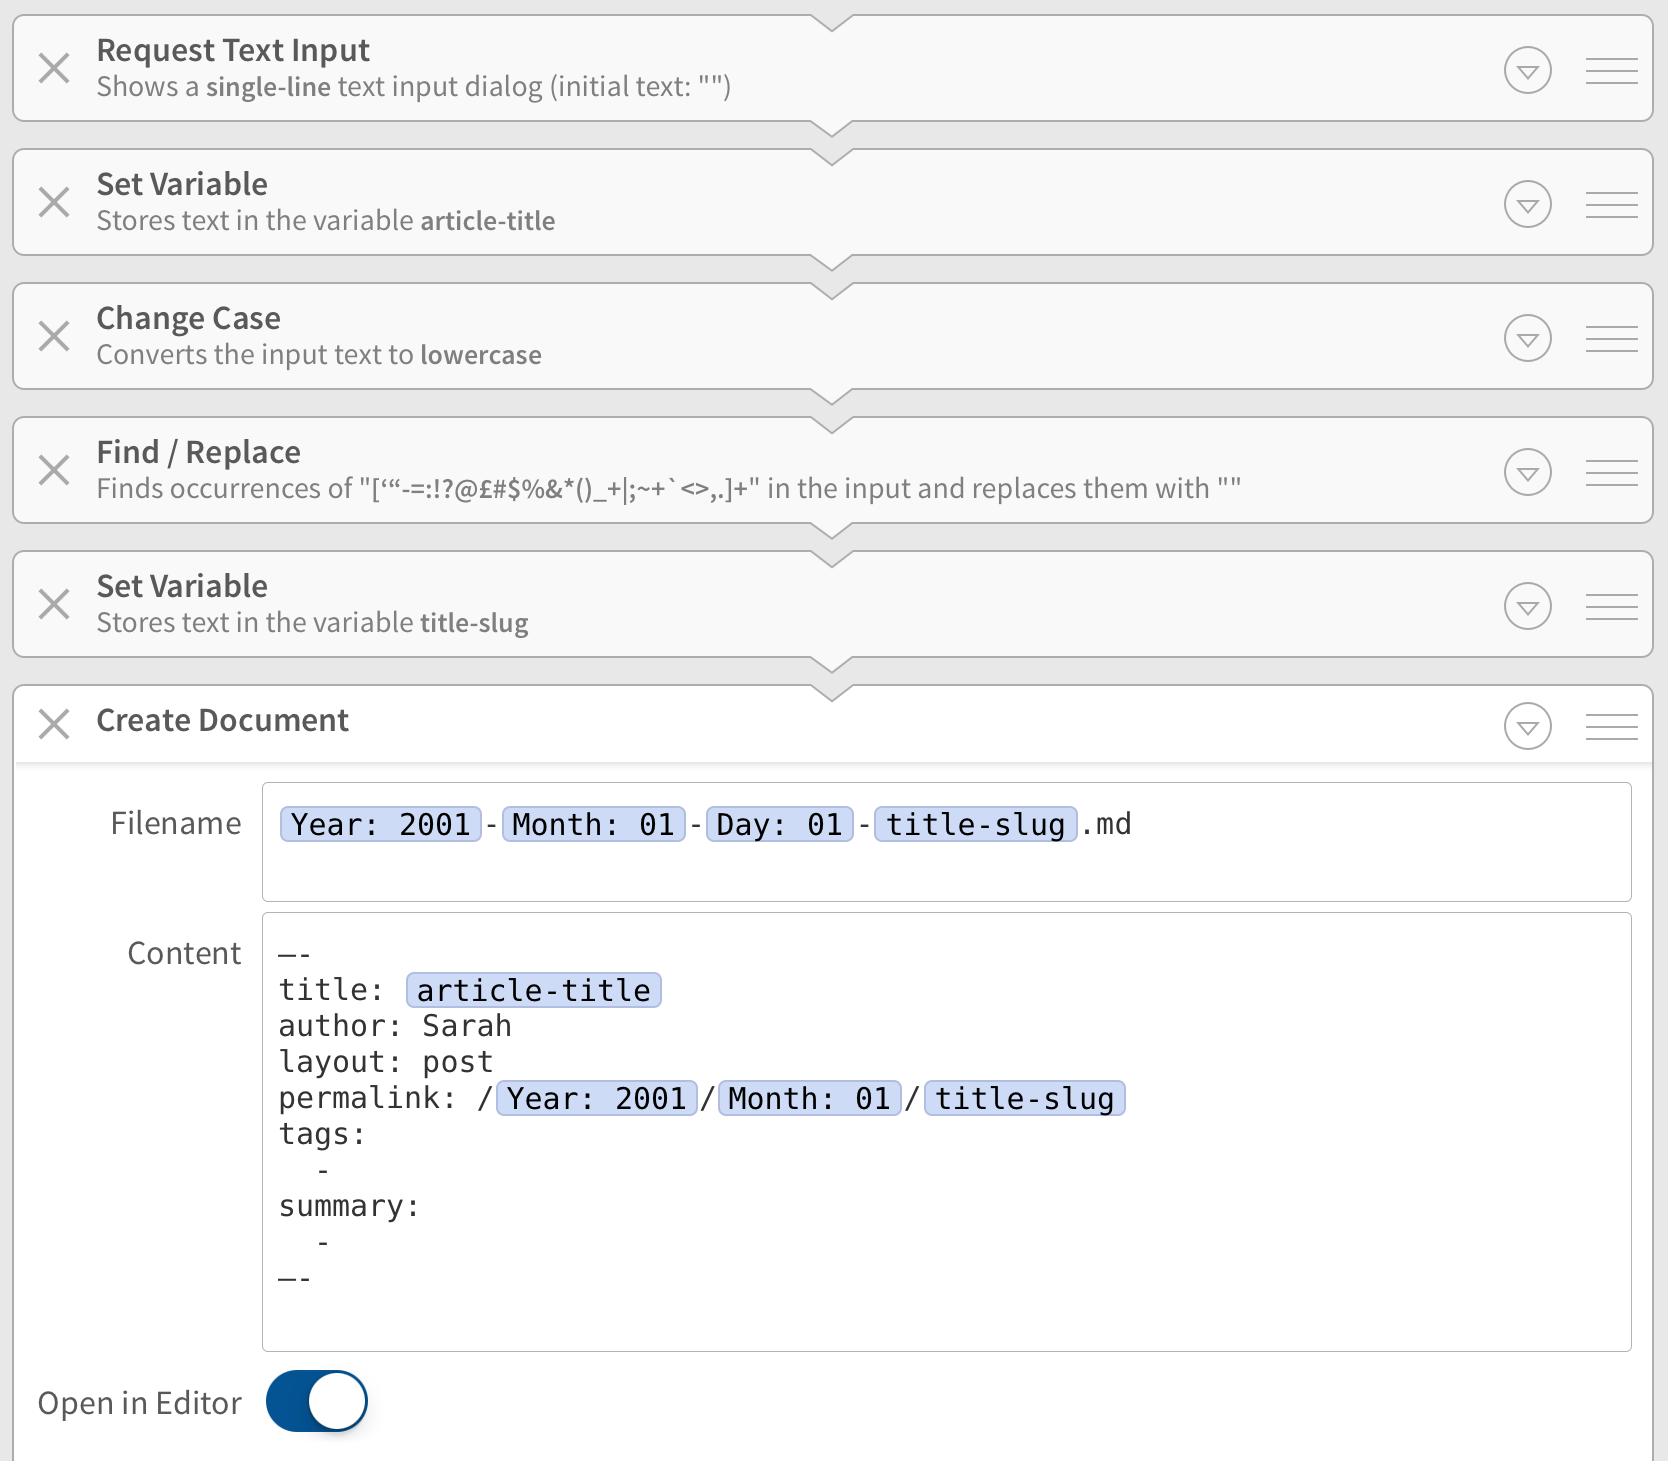
My site is published on GitHub Pages using Jekyll with all the posts and pages written in Markdown. One key feature is that every post or page requires a chunk of "front matter" that must be formatted correctly for the Jekyll parser to interpret it and create the static content. After a bit of research, it looked like Editorial was going to be the best option for an editor app. I moved my site files to Dropbox, linked my Dropbox account to Editorial and I was ready to start writing.
I didn’t want to create the front matter manually for each post. On my Mac I have a text expander snippet that handles that but copying from Matt Gemell’s post on the topic, I created an Editorial workflow to create a new post. As a side-note, Matt has a series of posts on using an iPad which I have found very useful and inspirational.
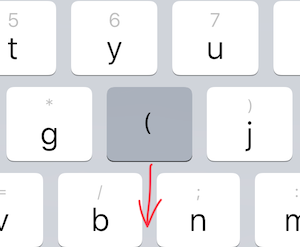
Text entry and editing is a task that I have always felt was too difficult in iOS, particularly when it came to selecting text and moving the cursor. However there are now several improvements. As with iOS 10, a two-fingered press on the keyboard transforms it into a trackpad for moving the cursor. If you already have text selected, this moves the selection handles. The new iOS 11 keyboard has a really nice feature for entering non-alphabetic characters. The keys now show a small grey character above the main character. Drag down on the key to move the small character into the main key and type it. For example, drag down on the h key to type (.
Editorial has its own editing helpers. There is an additional toolbar above the keyboard with a tab key as well as frequently used Markdown modifiers. And swiping across this toolbar moves the cursor. This is a much slower move than when using the keyboard as a trackpad so might be better for more precise movements.
Adding Links:
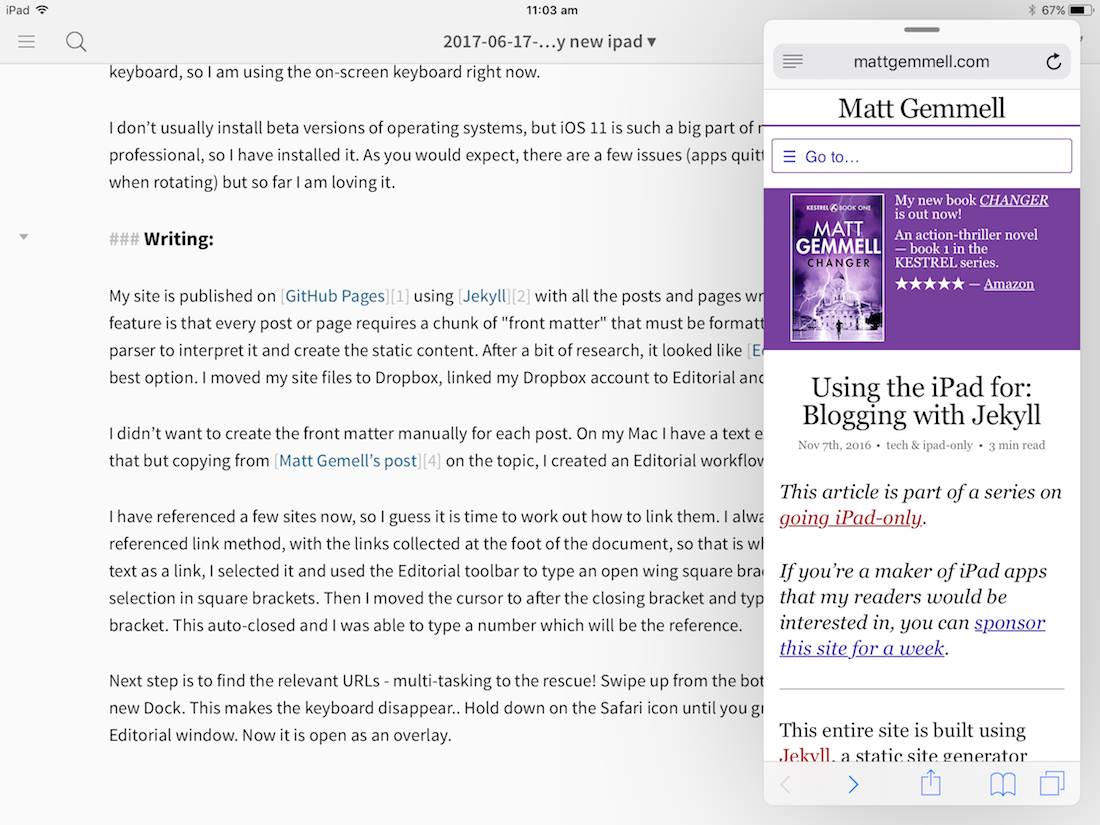
I have referenced a few sites now, so I guess it is time to work out how to link to them. I always use Markdown’s referenced link method, with the links collected at the foot of the document, so that is what I plan to do here. To set text as a link, I selected it and used the Editorial toolbar to type an opening square bracket which surrounded the selection in square brackets. Then I moved the cursor to after the closing bracket and typed another opening square bracket. This auto-closed and I was able to type a number which will be the reference.
Next step is to find the relevant URLs - drag & drop with multi-tasking to the rescue! Swipe up from the bottom of the screen to see the new Dock. This also makes the keyboard disappear. Hold down on the Safari icon until you grab it, then drag it up into the Editorial window. Now it is open as an overlay.
At this point, I have several options:
- Swiping from the left or right of the overlay window lets me position it to the right or left of the screen, still as an overlay.
- Dragging from the bar at the top of the overlap allows me to convert to split screen mode, and I can then drag the divider to adjust the ratios.
- Swiping all the way to the right disappears the overlay, but swiping back from the right edge returns it. Since I want to copy and paste some links, this looks like the best option right now.
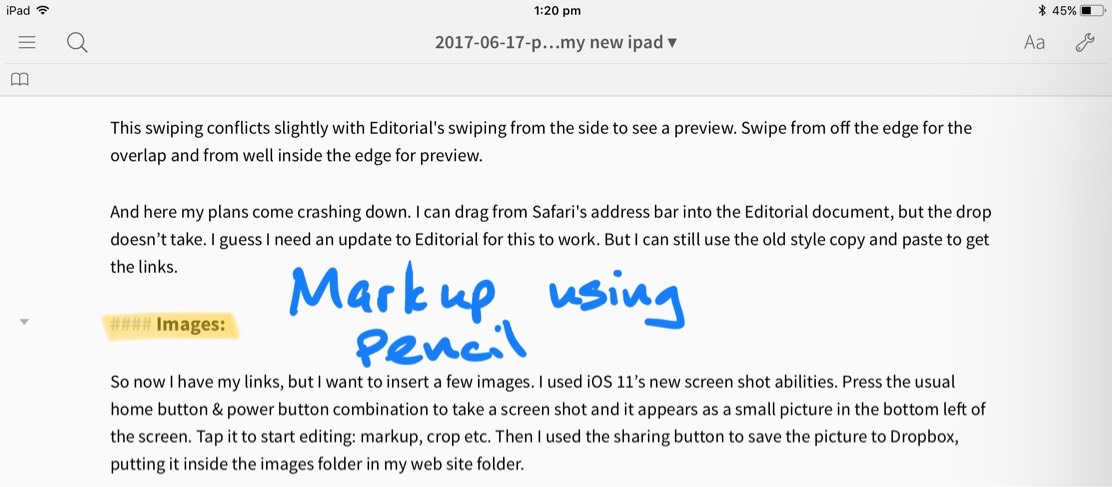
This swiping conflicts slightly with Editorial's swiping from the side to see a preview. Swipe from off the edge for the overlap and from well inside the edge for preview.
And here my plans come crashing down. I can drag from Safari's address bar into the Editorial document, but the drop doesn’t take. I guess I need an update to Editorial for this to work. But I can still use the old style copy and paste to get the links.
Images
So now I have my links, but I want to insert a few images. I used iOS 11’s new screen shot abilities. Press the usual home button & power button combination to take a screen shot and it appears as a small picture in the bottom left of the screen. Tap it to start editing: markup, crop etc. Then I used the sharing button to save the picture to Dropbox, putting it inside the images folder in my web site folder.
I want to insert an image link but I have just worked out that I saved this Markdown file in the root folder instead of the _posts folder. I can’t see a way to move it from inside Editorial, so I will swap to the Dropbox app to move the file - be right back... (I see now how I could have done this in Editorial.)
Ok, this file is in the right place and the images are in the right folder, so
how to add an image link? Checking back at previous posts, I see that the format
I use for inserting an image is: ![Alt text][#] and the reference at the foot
of the page is like[#]: /images/2017/image_name.jpg but I don’t want to have to
remember that every time, so I think it is time for some snippets. Tapping the
lightning icon on the Editorial keyboard lets me edit and create snippets, so I
have made one for the image link and one for the image reference. Time to scroll
back up the page and try them out.
I opened the Dropbox app in an overlay so that I could find the file names for the images I just saved, then I created the links. The images don’t appear in the preview but that is expected because Jekyll has not parsed the addresses. Looking at the information about the images in Dropbox, I see that they are far too big. I need a way to resize them. The screen shot editor doesn’t have a way to resize apart from cropping, at least not in this beta.
Workflow is another Pro level app that I have never really used, but it seems that it might do the job. I tried a few workflows to edit the size of an image from a Dropbox file and save it back, but they although they appeared to complete, the image file remained the same size. So then I went to the Workflow Gallery and found a workflow called Quick Resize Screenshot. When editing a screen shot, I can use the sharing button to run the workflow and then I can save the smaller images to Dropbox for use in the page. For the large images that I have already saved, I will resize them on my Mac before publishing.
Publishing
This brings me to the final step - publishing the changes to GitHub Pages.
Jekyll is a system that creates static web pages from the Markdown and other
files. on my Mac, I run the jekyll build command in Terminal and the pages are
created or re-generated as required. Then I use git to commit my changes and
push them to GitHub which serves them.
There appear to be Editorial workflows written in Python that use the GitHub APIs to upload files, but this wouldn’t work well for me. Because of the structure of my site, many different pages need to be re-generated when I publish a new post, so I will keep the publishing phase on my Mac. However there is no need to make it any more difficult than necessary, so I have written a shell script to do the work.
The script takes an optional commit message parameter, builds the site, commits changes and pushes then to GitHub. I have only tested this when no files had changed, so this post will be the first real test. Shell scripting is outside my comfort zone, so we will have to see how that works.
Summary
So now I have a workflow on my iPad that uses Editorial, Dropbox and Workflow. This allows me to do 100% of the writing task. Then I have a single shell script on my Mac that does the publishing part. I can edit and create posts anywhere. I can easily use split screen or screen overlays to add links. iOS 11 makes creating and annotating screen shots very easy.
I am hoping for an update to Editorial that will allow it to accept drag & drop. The ability to resize screen shots before saving them would also be really useful.
Sometimes my posts are more code-based and need access to Xcode and in those cases, I will stick to my Mac, especially considering Xcode’s new ability to connect directly to GitHub which will make it great for publishing Swift playgrounds. But for more narrative-style posts like this one, I will use my iPad and see how I can improve my workflow and expand my tool set.
It feels good to be using the iPad as a content creation device at last.
Extra Notes from a Mac:
Since this was my first time writing a blog post using an iPad and this
workflow, I decided that I should test the results before publishing, so I
switched back to the Mac and in Terminal, ran jekyll serve so that I could see
the results. There were a few issues mainly to do with the formatting of the
front matter. The three dashes at the top & bottom of the front matter had
become munged into an emdash plus a dash, so that didn’t work. Jekyll is also
fussy about the spaces in the tag & summary lines and it doesn't handle
non-alphanumerics in the summary text.
I also used the Mac to shrink some of the images that I had saved before working out how to reduce the size of screen shots.
So I need to check the structure of the front matter workflow before next time, but this post is ready to go with only minor editing on the Mac side. Now to test my shell script...